DIY LED strip voice control with Alexa and ESP8266
I'll tell you how I connected an LED strip to Amazon Alexa, using a Wemos D1 mini. An easy and cheap DIY home automation and IoT project.

Hello everybody!
It’s been already more than 6 months since I started this blog. Yet, so far I haven’t posted anything related to electronics.
So for this post, I decided to revive and share with you an old project, where I connected an LED strip to Amazon Alexa, using a microcontroller. Be warned: you’ll need to do a bit of soldering, but it should not be very difficult. For the coding part, I’m sharing the Arduino sketch that you can use to replicate this.
First, we'll go over the components I used. Then, I'll walk you through the process of wiring everything up and connecting the LED strip to Alexa.
Components
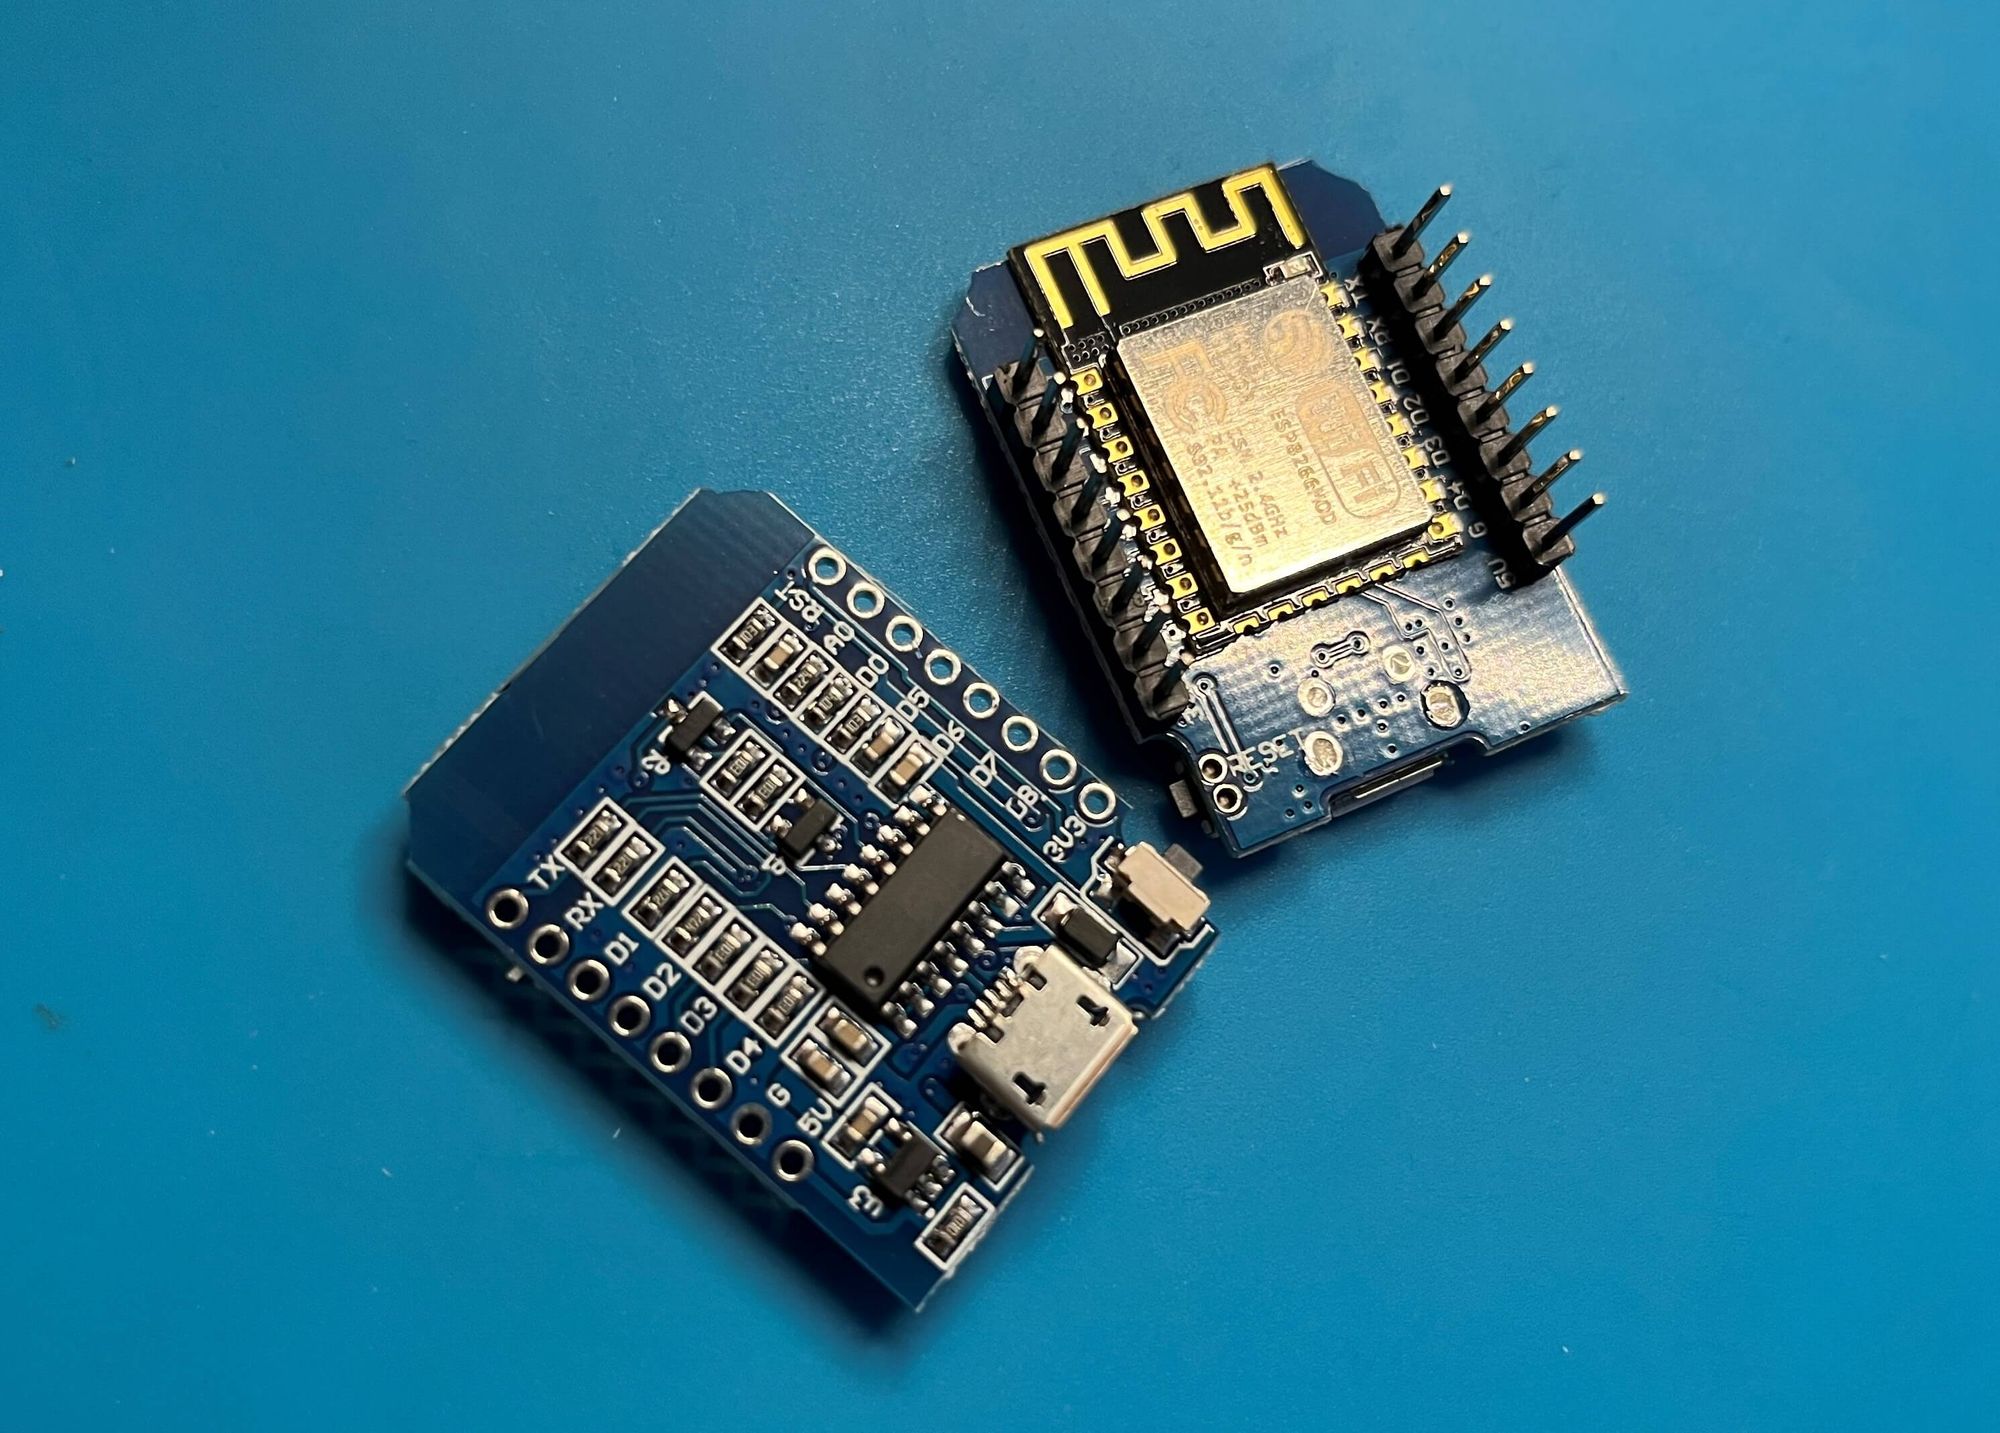
Wemos D1 mini
The Wemos D1 mini is a compact, low-cost ESP8266-based development board. Its small size, built-in Wi-Fi, and compatibility with the Arduino programming environment make it a popular choice for IoT and home automation projects. Its versatility and accessibility have made it a favorite among hobbyists and makers who enjoy exploring the world of connected devices.
It can be thought of as a more compact and versatile version of the Arduino Uno, offering the same functionality, in a smaller package. Moreover, the ESP8266 has an 80 MHz clock speed (vs the 16MHz of the ATmega328p used by the Arduino UNO) and works at a 3.3 V logic level, while Arduino works at 5V for logic pins.
Where to buy:
- Aliexpress (affiliate link). Dirty cheap, but long shipping time - this is the one I’ve used to buy a bung of these.
- Amazon. Three times the price from Aliexpress sometimes, for exactly the same components. But you get fast delivery.
5V LED Strip
I used a 5V LED strip, with only white light. It made it easier for me to wire everything and code the voice control. This kind of LED strip will only have 2 leads. Unfortunately, I don't have pictures of the LED strip that I used, because it is installed under my bed since I completed this project last year.
Switching the LED strip
When it comes to switching the LED strip on and off, I considered two different options:
- Low-Voltage relay
A type of relay that is designed to switch on and off with a low voltage control signal. These relays are typically used in applications where a microcontroller is used to control high-power devices, such as lights, motors, or appliances.
A low-voltage relay switch. Typically used with Arduino boards.

Low-voltage relays typically have a switch voltage rating of 5V or 3.3V, which is compatible with the voltage outputs of most development boards, like the Arduino UNO and the Wemos D1 Mini. They provide electrical isolation between the control circuit and the load, ensuring that the microcontroller is protected from high voltage or high current loads. They also typically have a compact size and are easy to use, making them a popular choice for DIY projects and hobbyists.
- Logic-level MOSFET
A logic-level MOSFET is a type of transistor used in electronic circuits to switch relatively high-power devices, such as motors, solenoids, and LED strips, on and off.
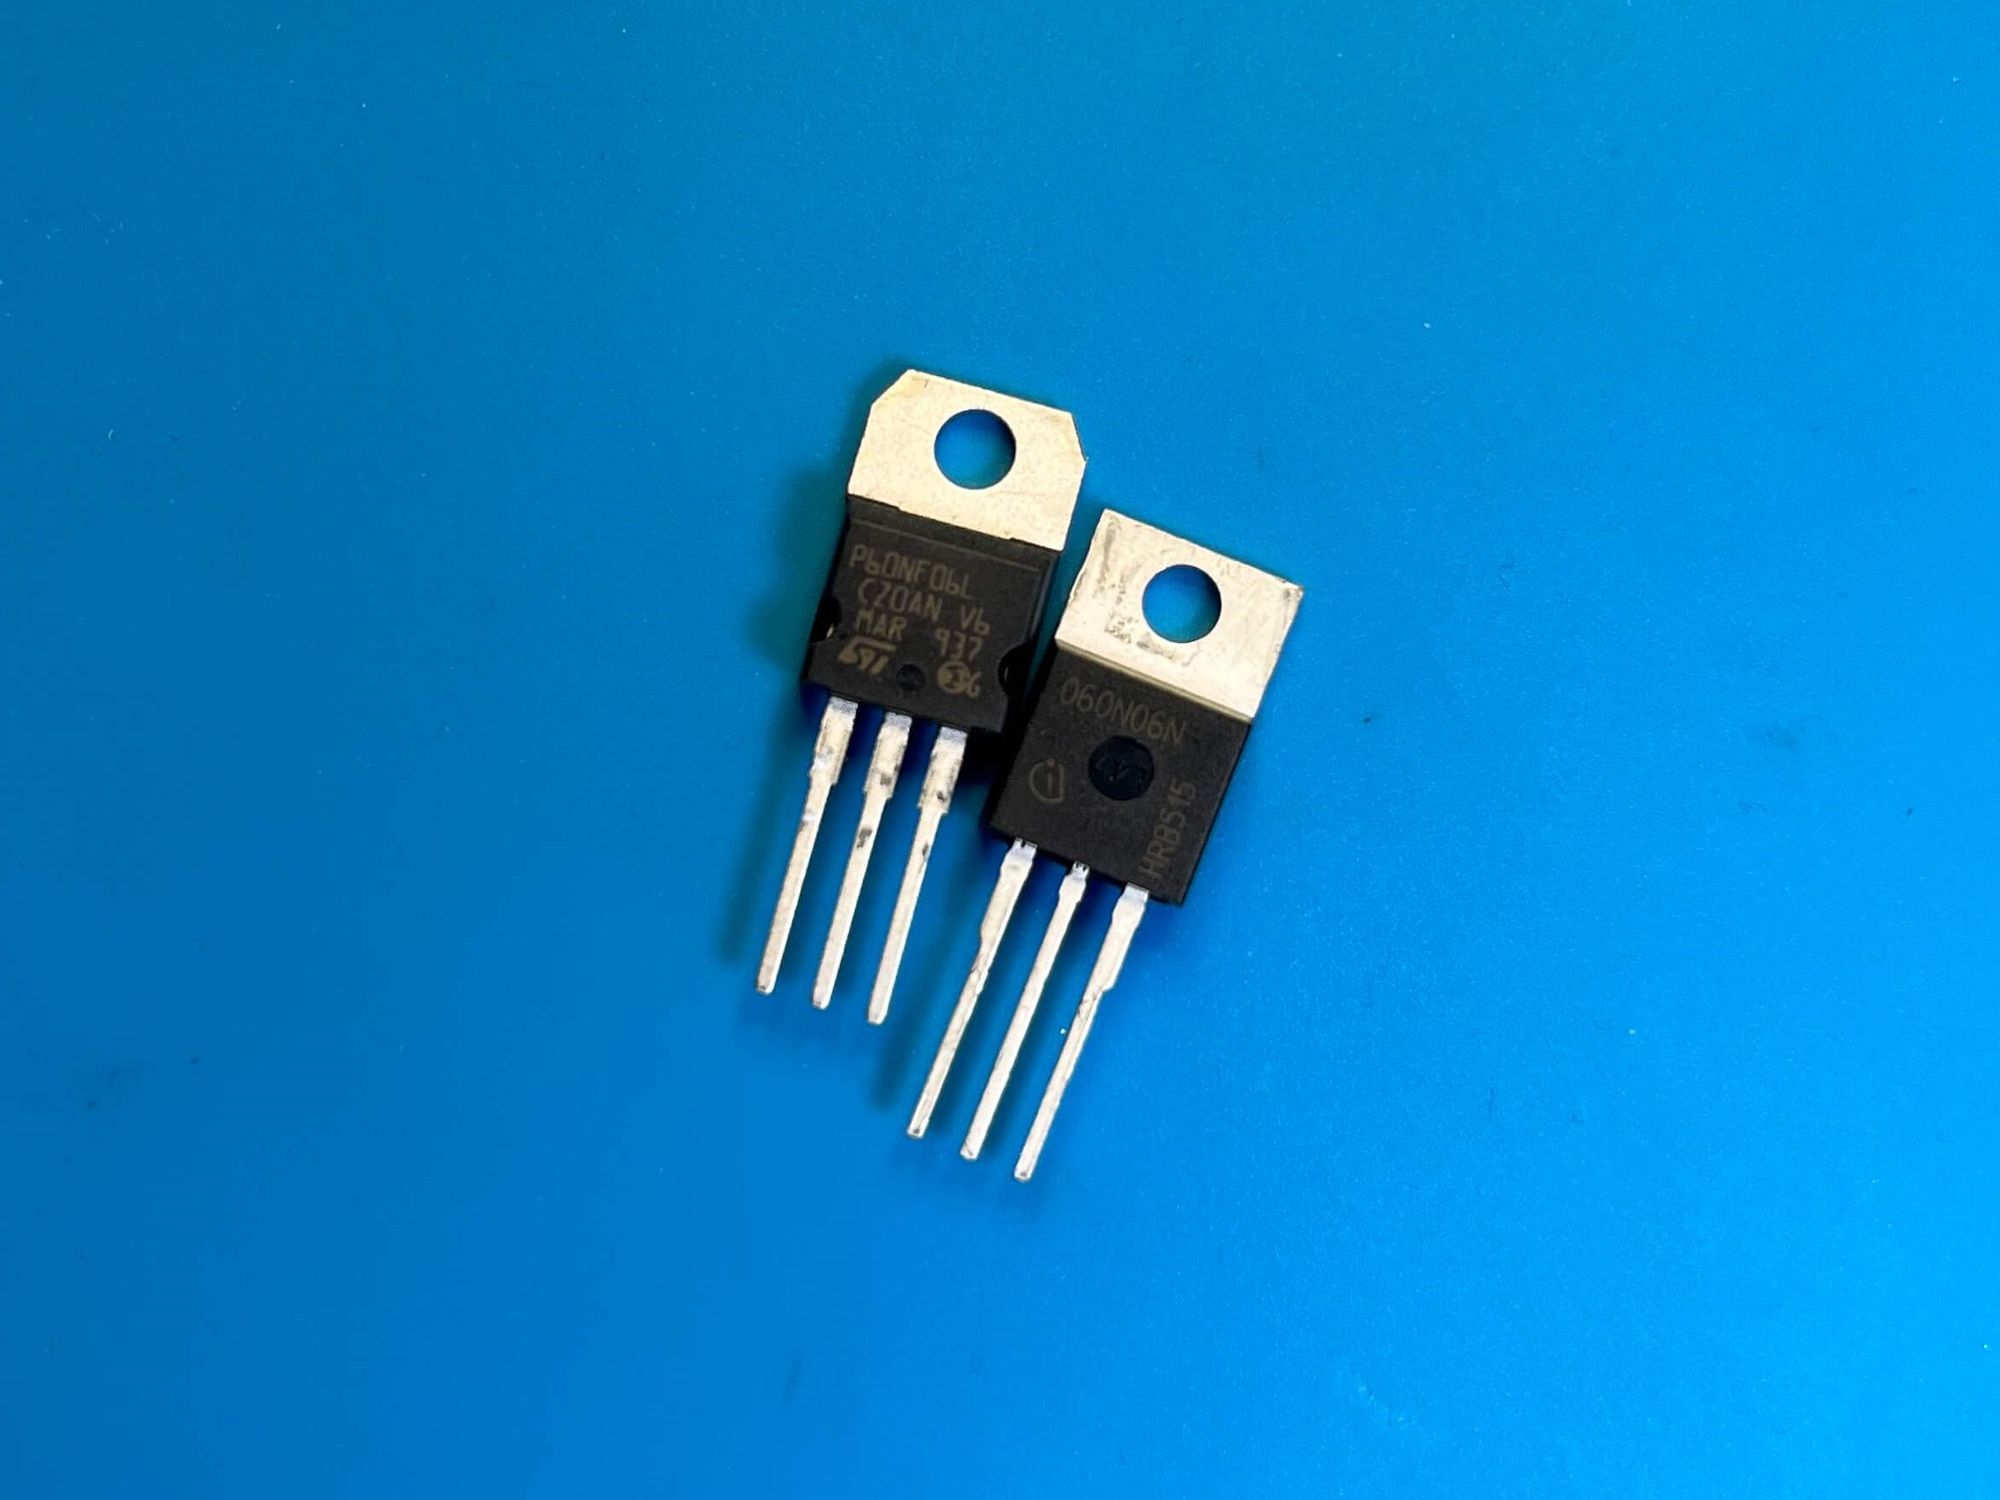
A standard MOSFET has a threshold voltage of around 10V, which is much higher than the 3.3V output of the ESP8266. When you try to drive a standard MOSFET using a microcontroller with 5V or 3.3V logic, the output voltage is not high enough to switch it’s state.
In contrast, a logic-level MOSFET has a threshold voltage of around 5 o 3.3V, which is compatible with the low voltage of the ESP8266 digital outputs.
Which one should I use?
The choice between using a logic-level MOSFET or a low-voltage relay switch depends on the specific requirements of your project. If you are controlling a low-power LED strip, a logic-level MOSFET is a cost-effective and compact solution that offers fast switching speed and low power consumption. However, if you are controlling a high-power device, a low-voltage relay switch provides a more reliable and versatile solution that can handle higher power loads and provides electrical isolation.
In my case, the LED strip was relatively short (2 meters). It consumed less than 2A at 5V, so a relay switch seemed overkill for me. Moreover, I was using it in my bedroom, so I wanted to avoid any switching noise and preferred to use a MOSFET instead of a Relay. For higher power (i.e. brighter LEDs or longer strip) you need to make sure that your MOSFET can handle the current and has enough cooling (maybe use a heat sink) or you can just go with a relay switch if the occasional noise is not a problem for you).
I used an 80N06L, but other logic-level FET would work just fine. To check if a MOSFET is logic-level, the “L” in it’s designation can give you a first indication, but it’s always better to look at their datasheets and look for the Vgs threshold voltage or their Drain Current vs Gate-Source voltage characteristics. Their threshold voltage must be lower than the 3.3V logic level of the ESP8266 when driving the current you need for the LED strip.
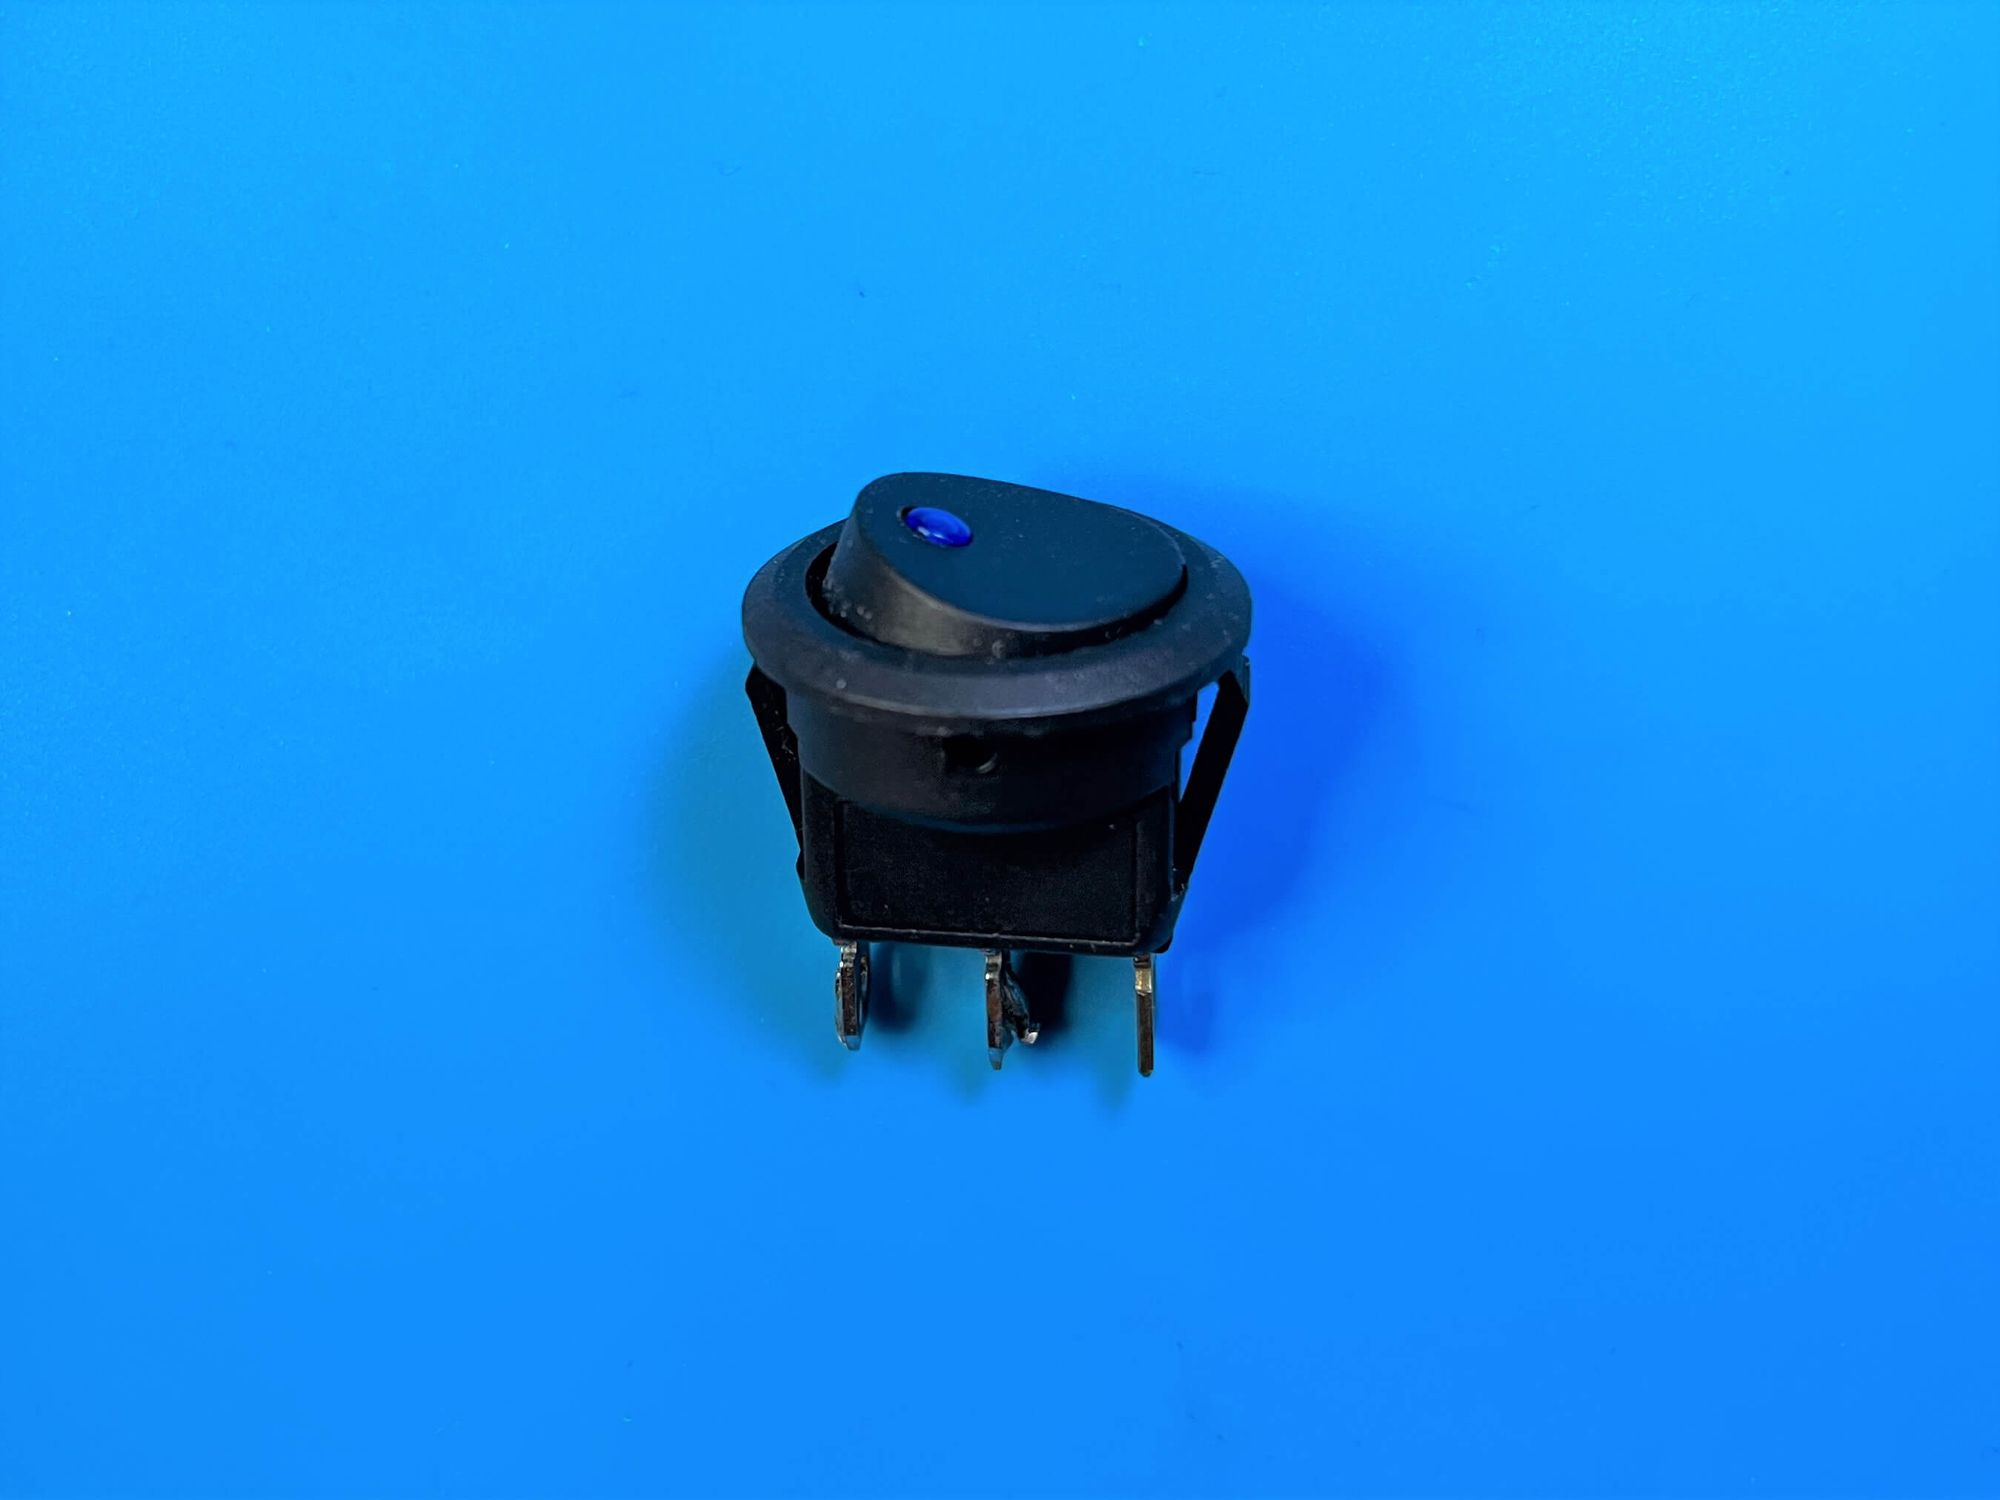
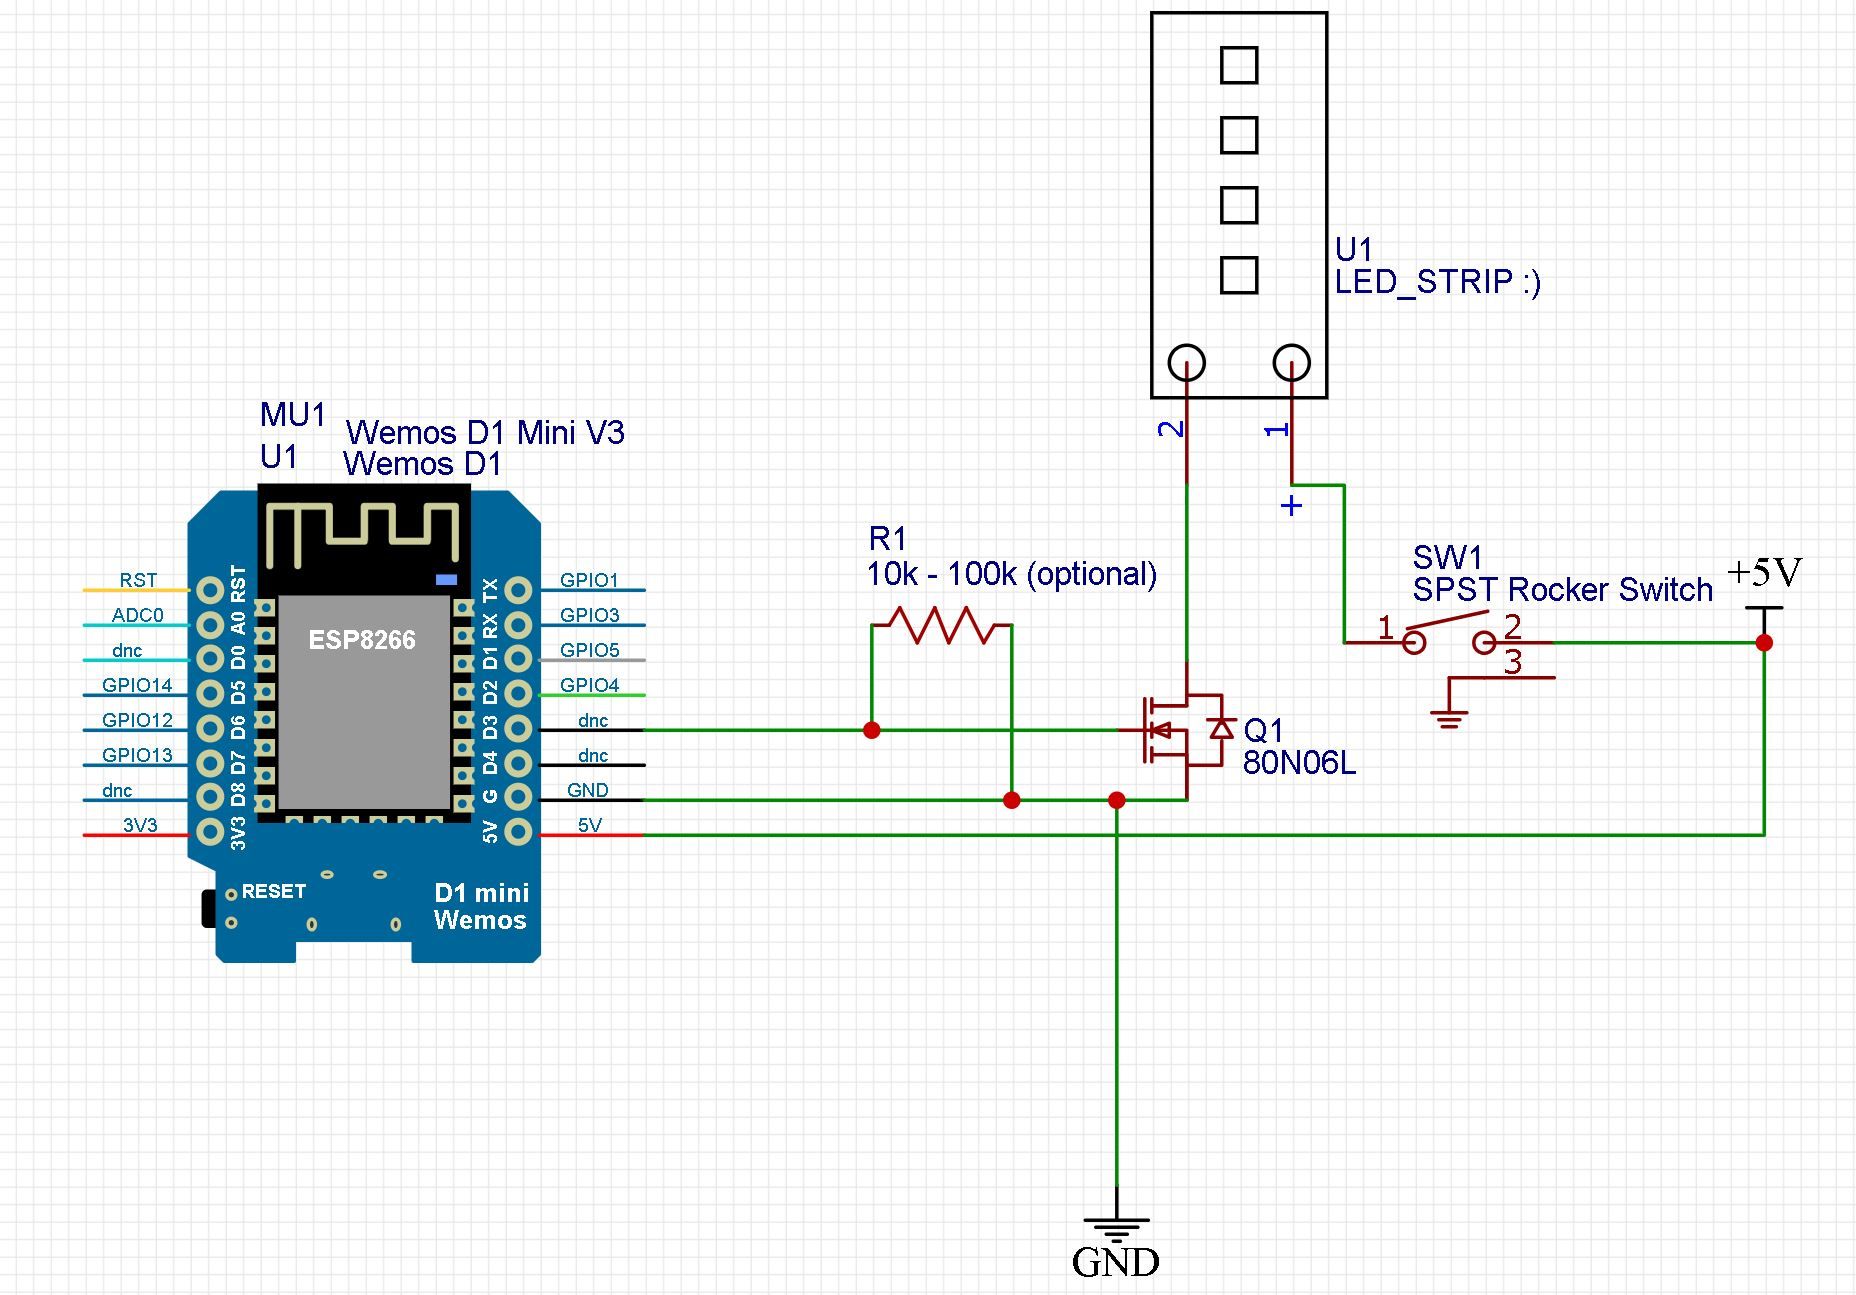
Rocker switch
I used this to manually switch on-off the LED strip if I need to.
Power supply
- USB phone charger
- USB charging cable (you'll need to strip it open for powering the LED. No need for the data cables, a cheap 2-wire USB cable will do just fine)
Optional (but recommended)
- Pull down resistor (any value between 1k and 100k). Used in case your LED remains ON after you have switched the power off. This is due to the residual capacitance of the MOSFET which is some cases is high enough to keep the LED on.
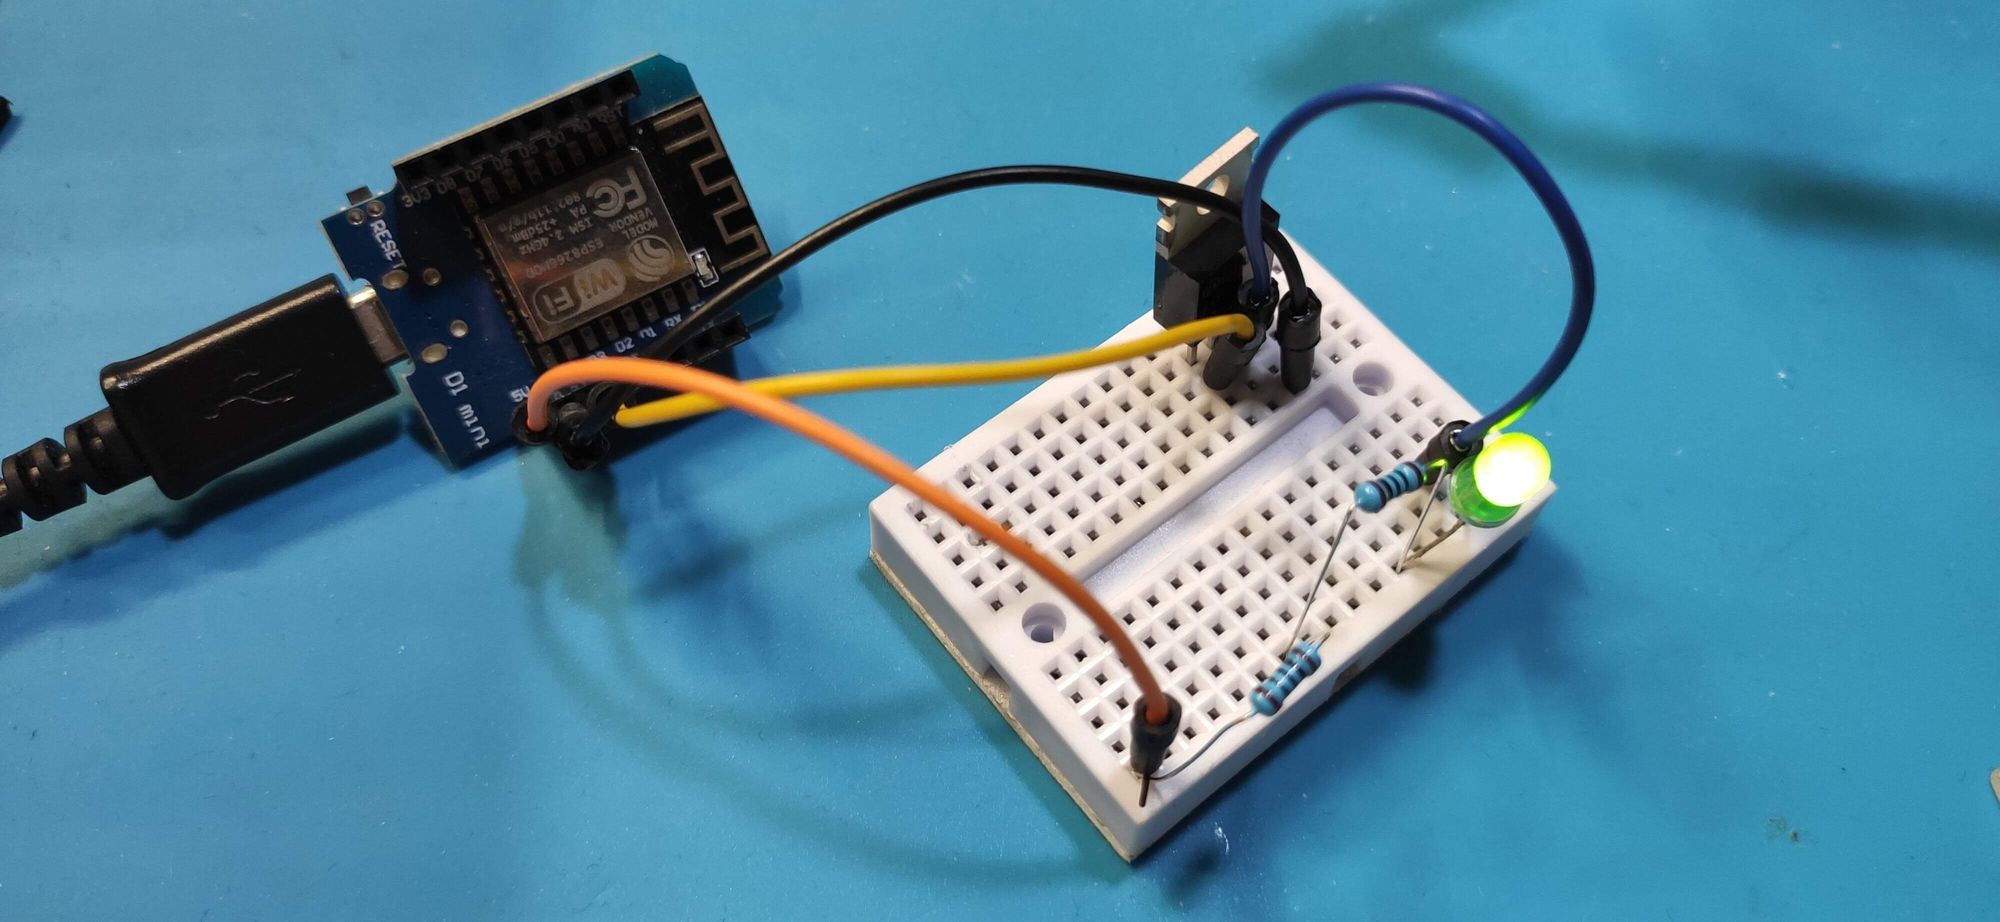
- Jumper wires and breadboard. You can use them to build a test circuit before wiring the final one.
- Led diode to test the sketch.
Tools
- Soldering iron and tin
- Wire strippers or Exacto knife to strip down the USB cable
Connections
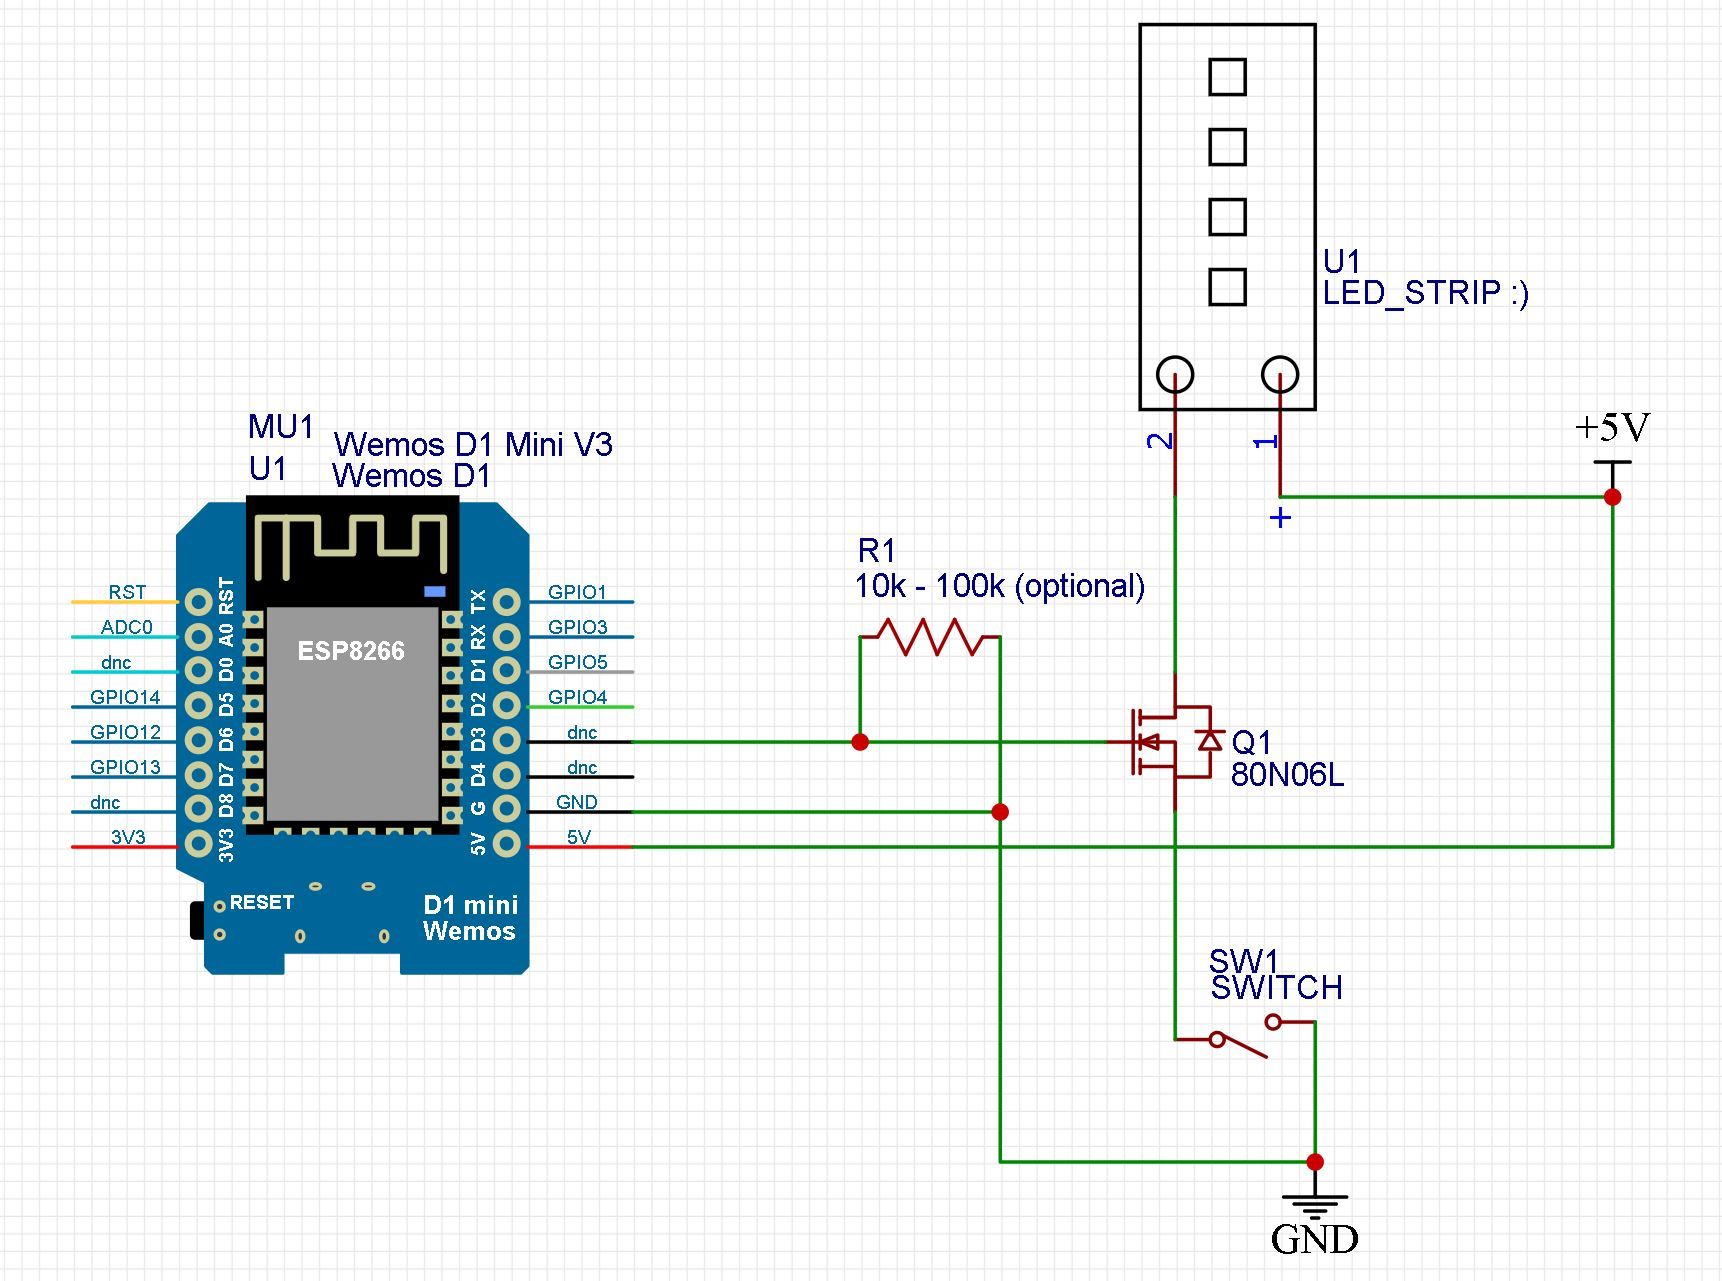
Connect the Source pin of the MOSFET to your reference ground, and the drain to the negative lead of the LED strip. The Gate pin of the MOSFET must be connected to a digital output pin of the Wemos, in my case I used pin D3 (which is actually GPIO0). If you want or need to use a different pin, you can look at the pinout of the Wemos D1 mini development board for ESP8266.
For the final circuit, you’ll need to power the Wemos D1 mini through the VCC and GND pins as shown in the schematic diagrams. For testing the circuit, you can power it directly from the micro USB port.
The code
To get started, I found an Arduino sketch on Github that served as a base for my project. The sketch was designed to control multiple switches through Alexa, but I did some modifications to meet my specific needs. With the modified code, I get a single LED strip to respond to commands from Alexa.
You can download everything from my Github repository.
 luisdamed
With this code, the Wemos D1 mini will connect to your home Wifi and emulate an Alexa-compatible IoT device. Once you pair it with Alexa - as you would with any other device, you can tell Alexa to turn your LED ON or OFF. The circuit with the physical switch allows you to manually turn the LED ON or OFF as well. Just bear in mind that if you use the switch, the LED strip won’t turn ON even if you command Alexa to do it - The Wemos will drive the digital pin high, but there will be no current supply to the LED. I might do an improved version of this, to recognize when the LED is being supplied with current or not - but for now, I don’t need it :)
If you are using Arduino IDE, you’ll just need to download the folder Wemos_D1_mini_Alexa_LEDstrip_Arduino. You’ll also need to follow a few steps to install the ESP8266 add-on to the Arduino IDE.
If you prefer using Platform IO, you just need to import the project folder 20230129_WemosD1Mini_Alexa_LEDStrip, and you should be able to use it directly within Visual Studio Code.
There are a few things you need to change to use this sketch.
First, you need to declare and define the pin used to drive the relay (or in this case, the MOSFET)
// MOSFET PIN
/* Use this pin to drive a Logic-level MOSFET. Recommended: RFP30N06LE, 80N06L
The MOSFET will be used to open/shot the ground wire from the LED to turn it
ON or OFF based on the logic state of this pin*/
const int relay = 0; // Wemos D1 mini Pin D3
Second, you need to provide your credentials, to allow the Wemos board to connect to the WiFi network.
// Change this before you flash
const char* ssid = "yourSSID";
const char* password = "yourPASSWORD";
If you want to customize the name Alexa uses to recognize your LED strip (”Alexa invocation name”), you can change that modifying this line:
// Define your switches here. Max 10
    // Format: Alexa invocation name, local port no, on callback, off callback
    LED = new Switch("LED strip", 82, LEDon, LEDoff);
Once you modify those parameters, you can flash the code to the Wemos D1 mini. It’s a good idea to try first using a single LED. I did that on a small breadboard.
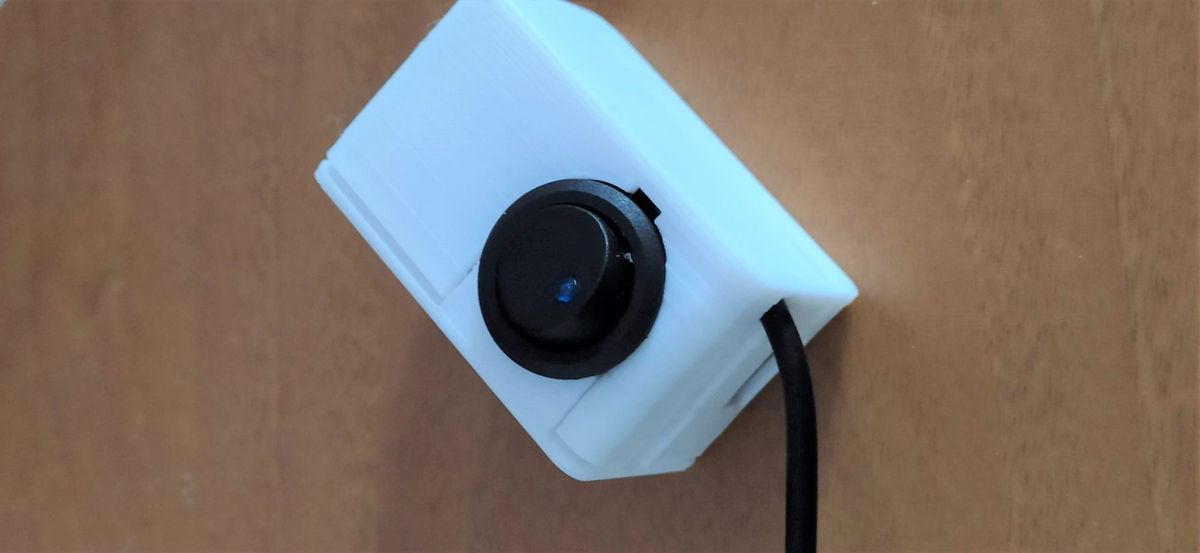
Final results
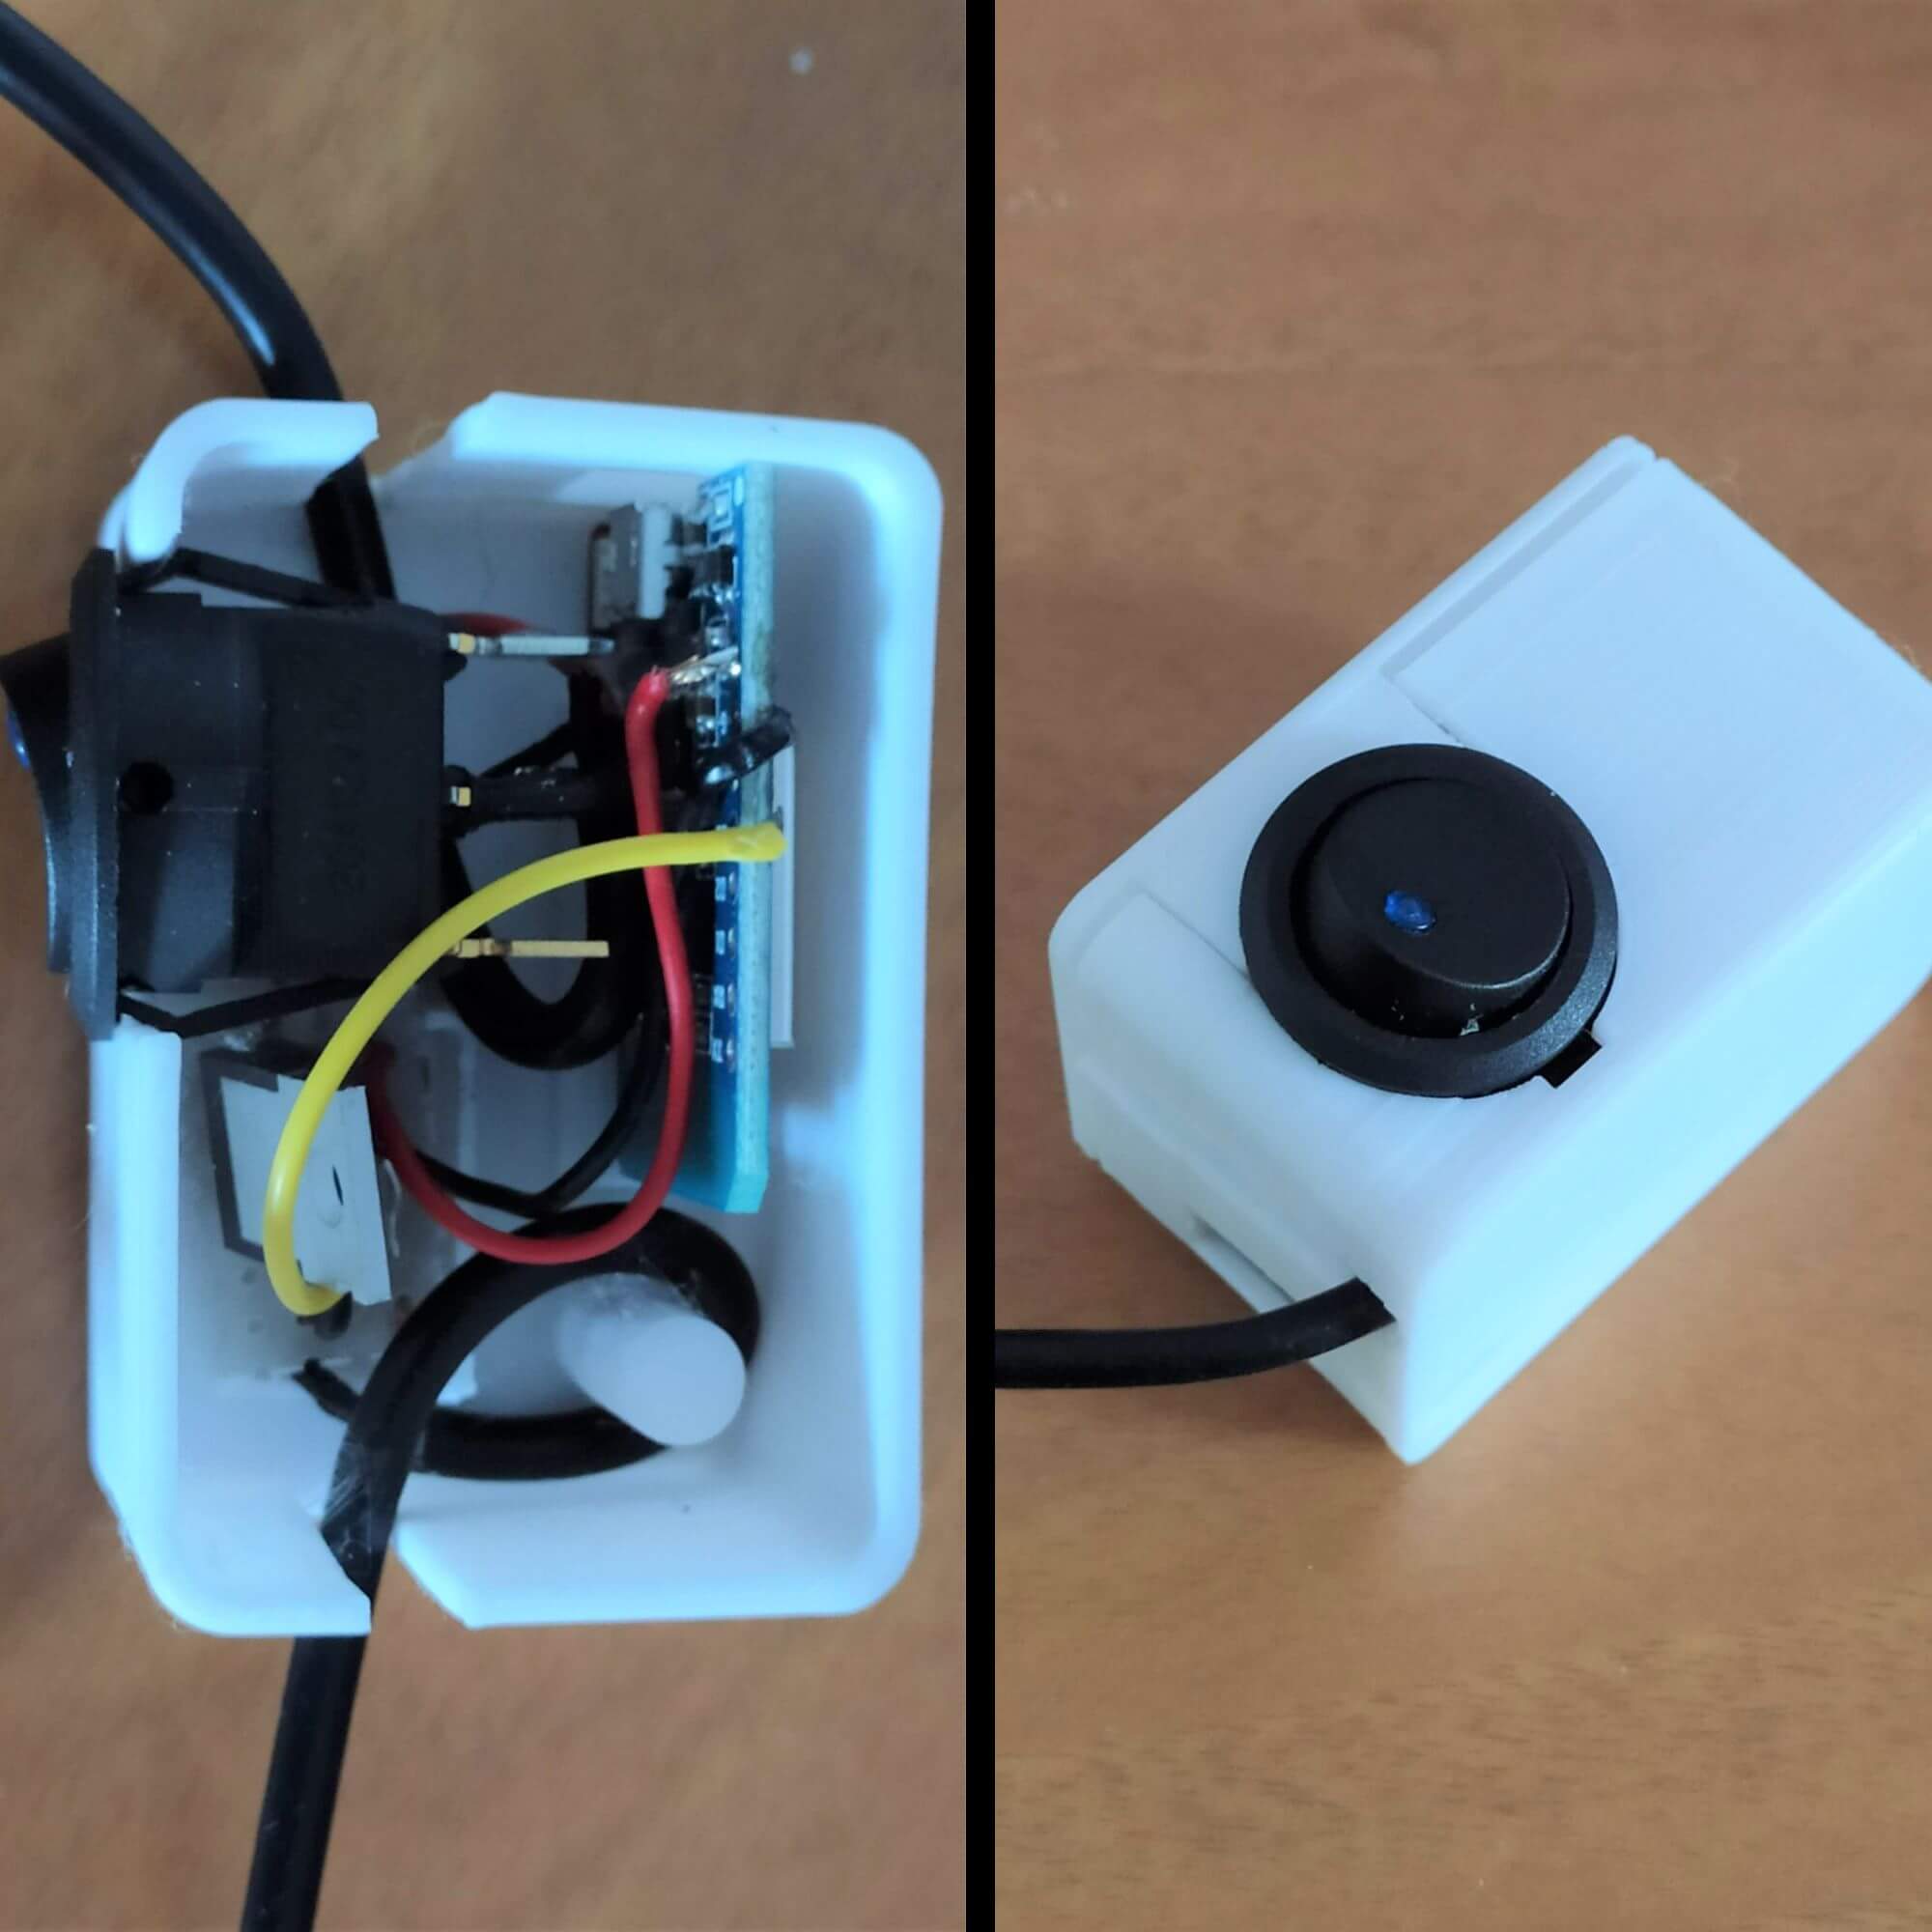
To finish the project, I made a simple enclosure using Autodesk Fusion 360, and 3D printed it. This way I keep everything protected.
Conclusion
The use of a logic-level MOSFET was crucial in this project, as it allowed me to control the relatively high-power LED strip using the low-power ESP8266.
Yes, there are many smart LED strips that can buy off-the-shelf out there, but the idea of this project was to make something myself and dive into the world of IoT and home automation. Additionally, I got to practice some C++ coding and have some fun soldering and 3d printing stuff. You know, the usual “makers gonna make” kind of stuff you’d find all over the internet.
This project is perfect for anyone who wants to get their hands dirty with the DIY approach as I did, and learn a bit about IoT and home automation.
I hope this post inspires some of you to try your own IoT projects using an ESP8266 and Alexa.
Let me know in the comments if you have any questions about my setup, or if you have any projects of your own you'd like to share!
Happy making!