Getting the size of a 3D print model from G-code
I wrote a Python script to get the size of a 3D print job from Gcode. Let me show you how it works.

Sounds like a lot of work just to get the dimensions from a 3D printable model, but it really isn't.
Let me show you how I did it.
Table of contents
- Why write custom Python code for this?
- Using G-code comments to distinguish print features
- Regular expressions
3.1. Testing regular expressions
3.2. Obtaining X, Y and Z coordinates
3.3. Extrusion width - Python script
4.1. Reading a G-code file as a string
4.2. Getting a list of floats from Regex matches - The final result
Extra: About 3D printed terrain models
Why write custom Python code for this?

The problem
Last year, I 3D printed a couple of terrain models as Christmas gifts for family and friends. Now, 5 months later, I was ready to make more of those, but I could no longer find the STL files I used for printing.
The only thing I had was different G-code files with similar names, and no way to tell which was the one I used for the final prints.
I could just download the 3D terrain models again, but:
- I didn't take notes of the exact coordinates of the terrain I extracted for printing.
- I did some careful scaling (height, Z) and sizing (X, Y) before printing them the first time, and starting from a fresh download would mean I’d have to repeat all of it.
The printed models needed to fit in a particular type of frame, and each layer had to represent a particular height in the actual terrain. This is why I needed to know the maximum dimensions of the model being printed.
There already exist websites where you can simply upload your G-Code files and get the dimensions of the geometry you are going to print.
A quick search on Google shows two main results:
G-Code Analyser: great for determining statistics of your print, like time spent at different speeds and feed rates, but without information on the model size.
G-Code Viewer: shows you some information about the model size, but it was not accurate for my purposes. Probably because it includes the skirt line when determining the size.
To test this, I uploaded a sliced file of an 18 mm cube and checked the Model Info section.
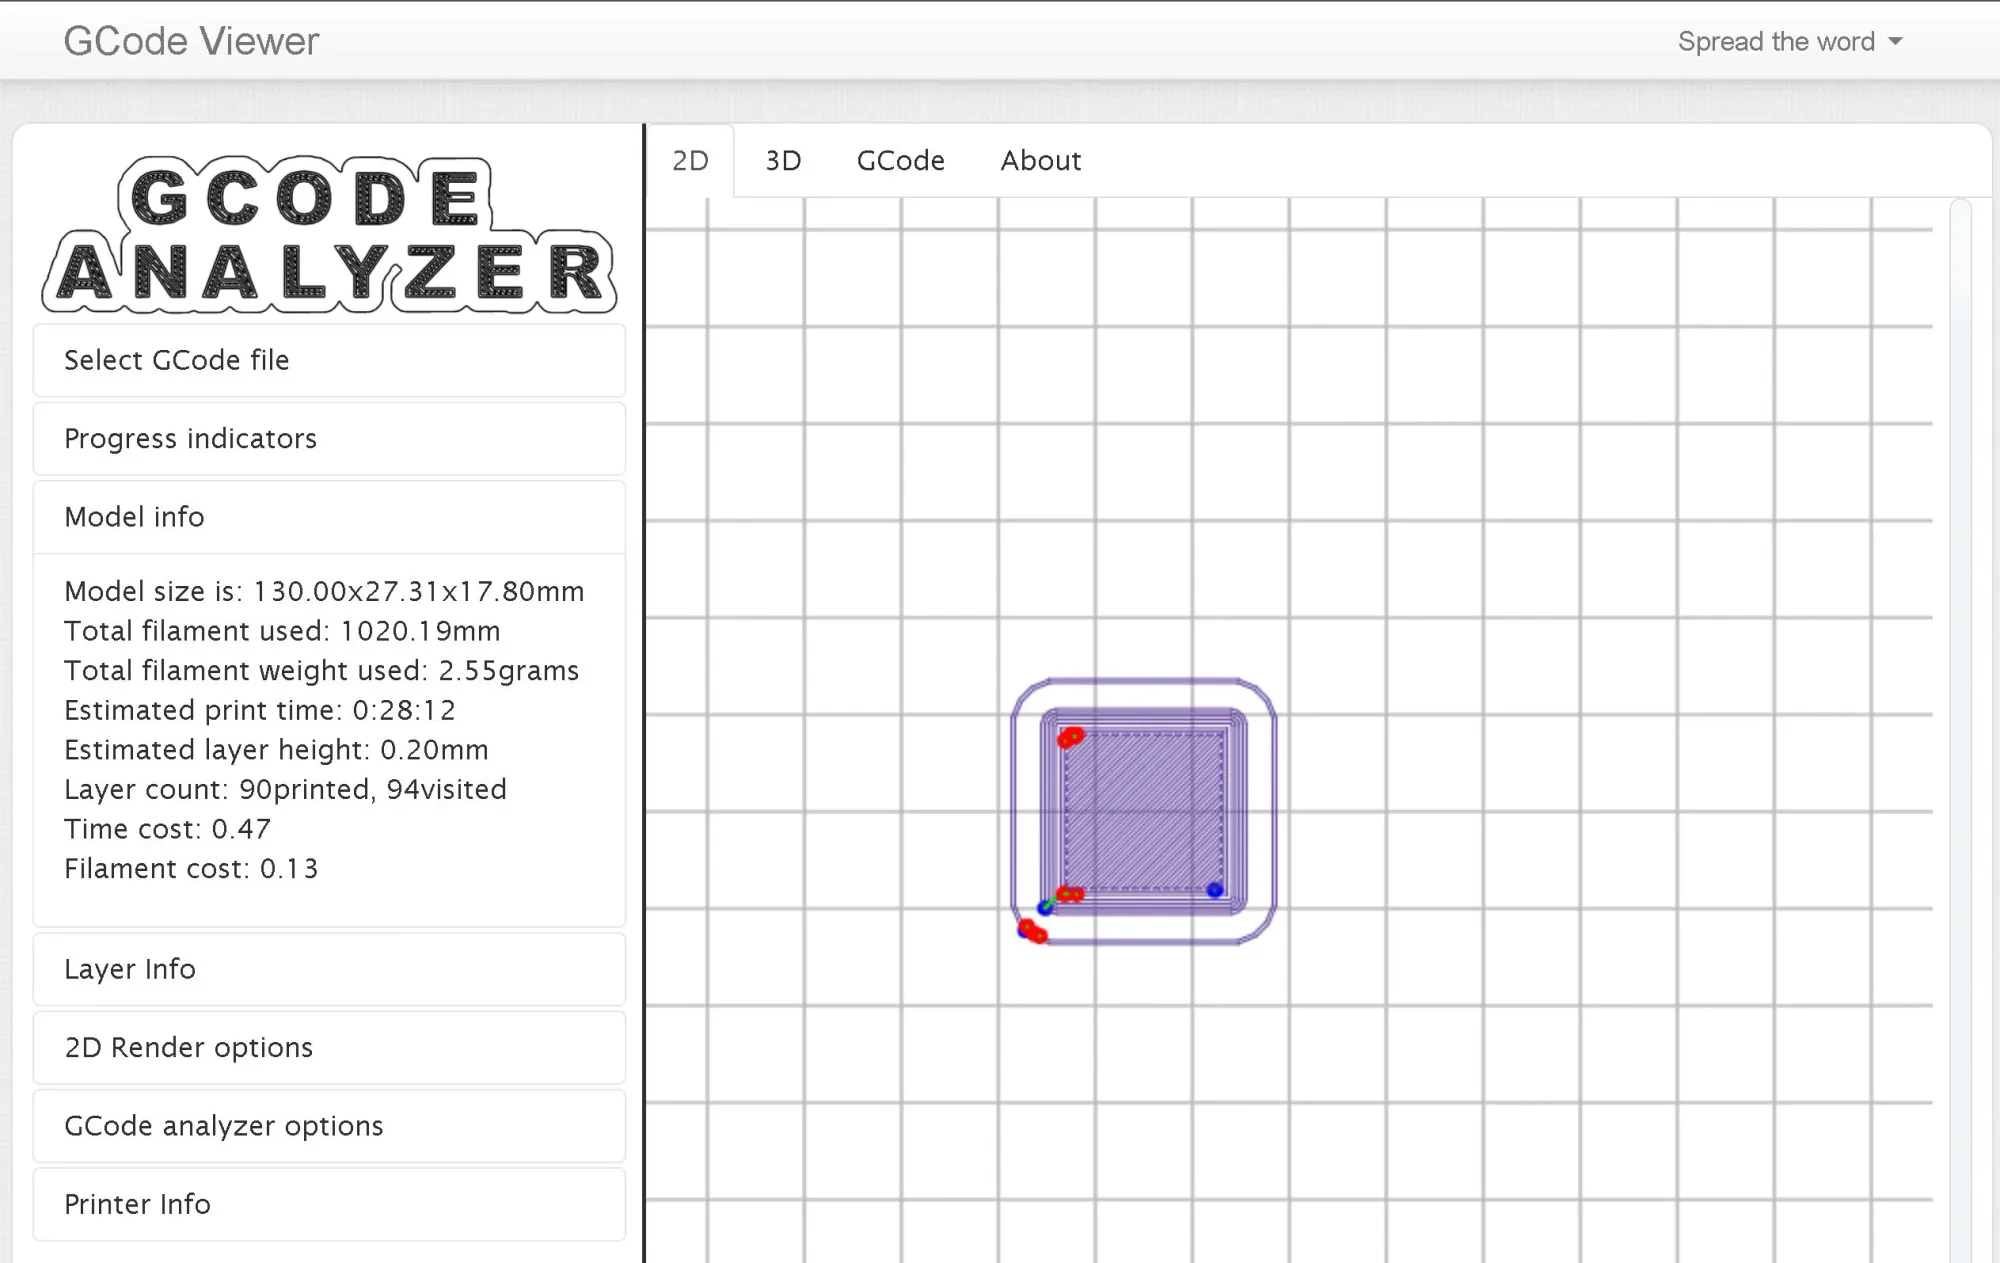
The dimensions shown are surely not the ones of the cube I sliced, which is what I’d like to get.
This led me to find another way.
Also, as you might know, if you've been reading my blog, I just like learning Python and automating stuff.
Using G-code comments to distinguish print features
Luckily, the G-code files I created were done in PrusaSlicer (which is built from Slic3r), with the “Verbose G-code” option enabled. This means each line has a comment, indicating what type of feature it is.
This is not only useful for making Octolapses, but also when analyzing the G-code. Here’s an extract of one of the files I had for the 3D-printed terrain models.
...

;LAYER_CHANGE
;Z:0.2
;HEIGHT:0.2
;BEFORE_LAYER_CHANGE
G92 E0.0
;0.2

M73 P0 R464
G1 E-3 F2400 ; retract
G1 Z.24 F720 ; lift Z
;AFTER_LAYER_CHANGE
;0.2
G1 X21.554 Y39.999 F9000 ; move to first skirt point
G1 Z.2 F720 ; restore layer Z
G1 E3 F2220 ;  ; unretract
M204 P800 ; adjust acceleration
;TYPE:Skirt/Brim
;WIDTH:0.42
G1 F600
G1 X22.494 Y39.805 E.03008 ; skirt
G1 X162.494 Y39.805 E4.3896 ; skirt

...

G1 X21.508 Y40.037 E.0409 ; skirt
M204 P1000 ; adjust acceleration
; printing object rawmodel-70579.stl id:0 copy 0
G1 E-2.1 F2400 ; retract
;WIPE_START
G1 F7200
G1 X22.494 Y39.805 E-.32069 ; wipe and retract
G1 X24.181 Y39.805 E-.53431 ; wipe and retract
;WIPE_END
G1 E-.045 F2400 ; retract
G1 Z.44 F720 ; lift Z
G1 X24.412 Y44.101 F9000 ; move to first perimeter point
G1 Z.2 F720 ; restore layer Z
G1 E3 F2220 ;  ; unretract
M204 P800 ; adjust acceleration
;TYPE:Perimeter
;WIDTH:0.419999
G1 F600
G1 X160.575 Y44.101 E4.2693 ; perimeter
G1 X160.575 Y131.785 E2.74927 ; perimeter
M73 P0 R463
G1 X160.186 Y131.816 E.01226 ; perimeter
G1 X160.038 Y131.891 E.00518 ; perimeter
...
Bingo! The comments let you distinguish between skirts and perimeters.
From the code, you can see that each line for a perimeter has a similar form or pattern: G1 X[number] Y[number] E[number]; perimeter.
In case there is a movement in the Z axis, the pattern is different. The code itself it’s always G1 Z[number] F[number] , but the comment can be either ; lift Z or ; restore layer Z. The latter is the one that actually indicates when the print is being done, since you can lift the hot end during retractions or movements too.
So how do you search for X, Y and Z values within a large text file using the information from the comments to consider only the lines of code corresponding to perimeters?
You could iterate over the file, line by line and include a lot of conditions. Or you could convert it into a pandas dataframe, and do some clever filtering to extract the numerical values.
But I thought this was a perfect case for using regular expressions.
Regular expressions
If you are not familiar with them, regular expressions (RegEx) let you identify patterns within a string. This is different from a normal string search, when you look for the actual characters.
I learned about them on the Scientific Computing with Python Certification on FreeCodeCamp.
Even if you don’t know exactly what characters you’ll find, a RegEx lets you identify them and extract them, if they are arranged in a regular way.
It’s like telling your code to look for “X followed by any digit, a decimal point and then any number of digits”. This kind of instruction comes from a RegEx pattern.
To use them with Python, we simply need to include import re at the start of our code, to include the Regular Expressions Library.
Testing regular expressions
Every time..
by u/YourTacosAreMine in ProgrammerHumor
Learning regular expressions is hard. Every time I use them, I spend some time learning again about them, and then defining the proper pattern to identify what I need from strings.
To test my RegEx patterns, I used Pythex, a website that lets you try regular expressions for Python.
In this case, I needed to both identify only the lines corresponding to perimeters, and extract only the X and Y coordinates.
Obtaining X, Y and Z coordinates
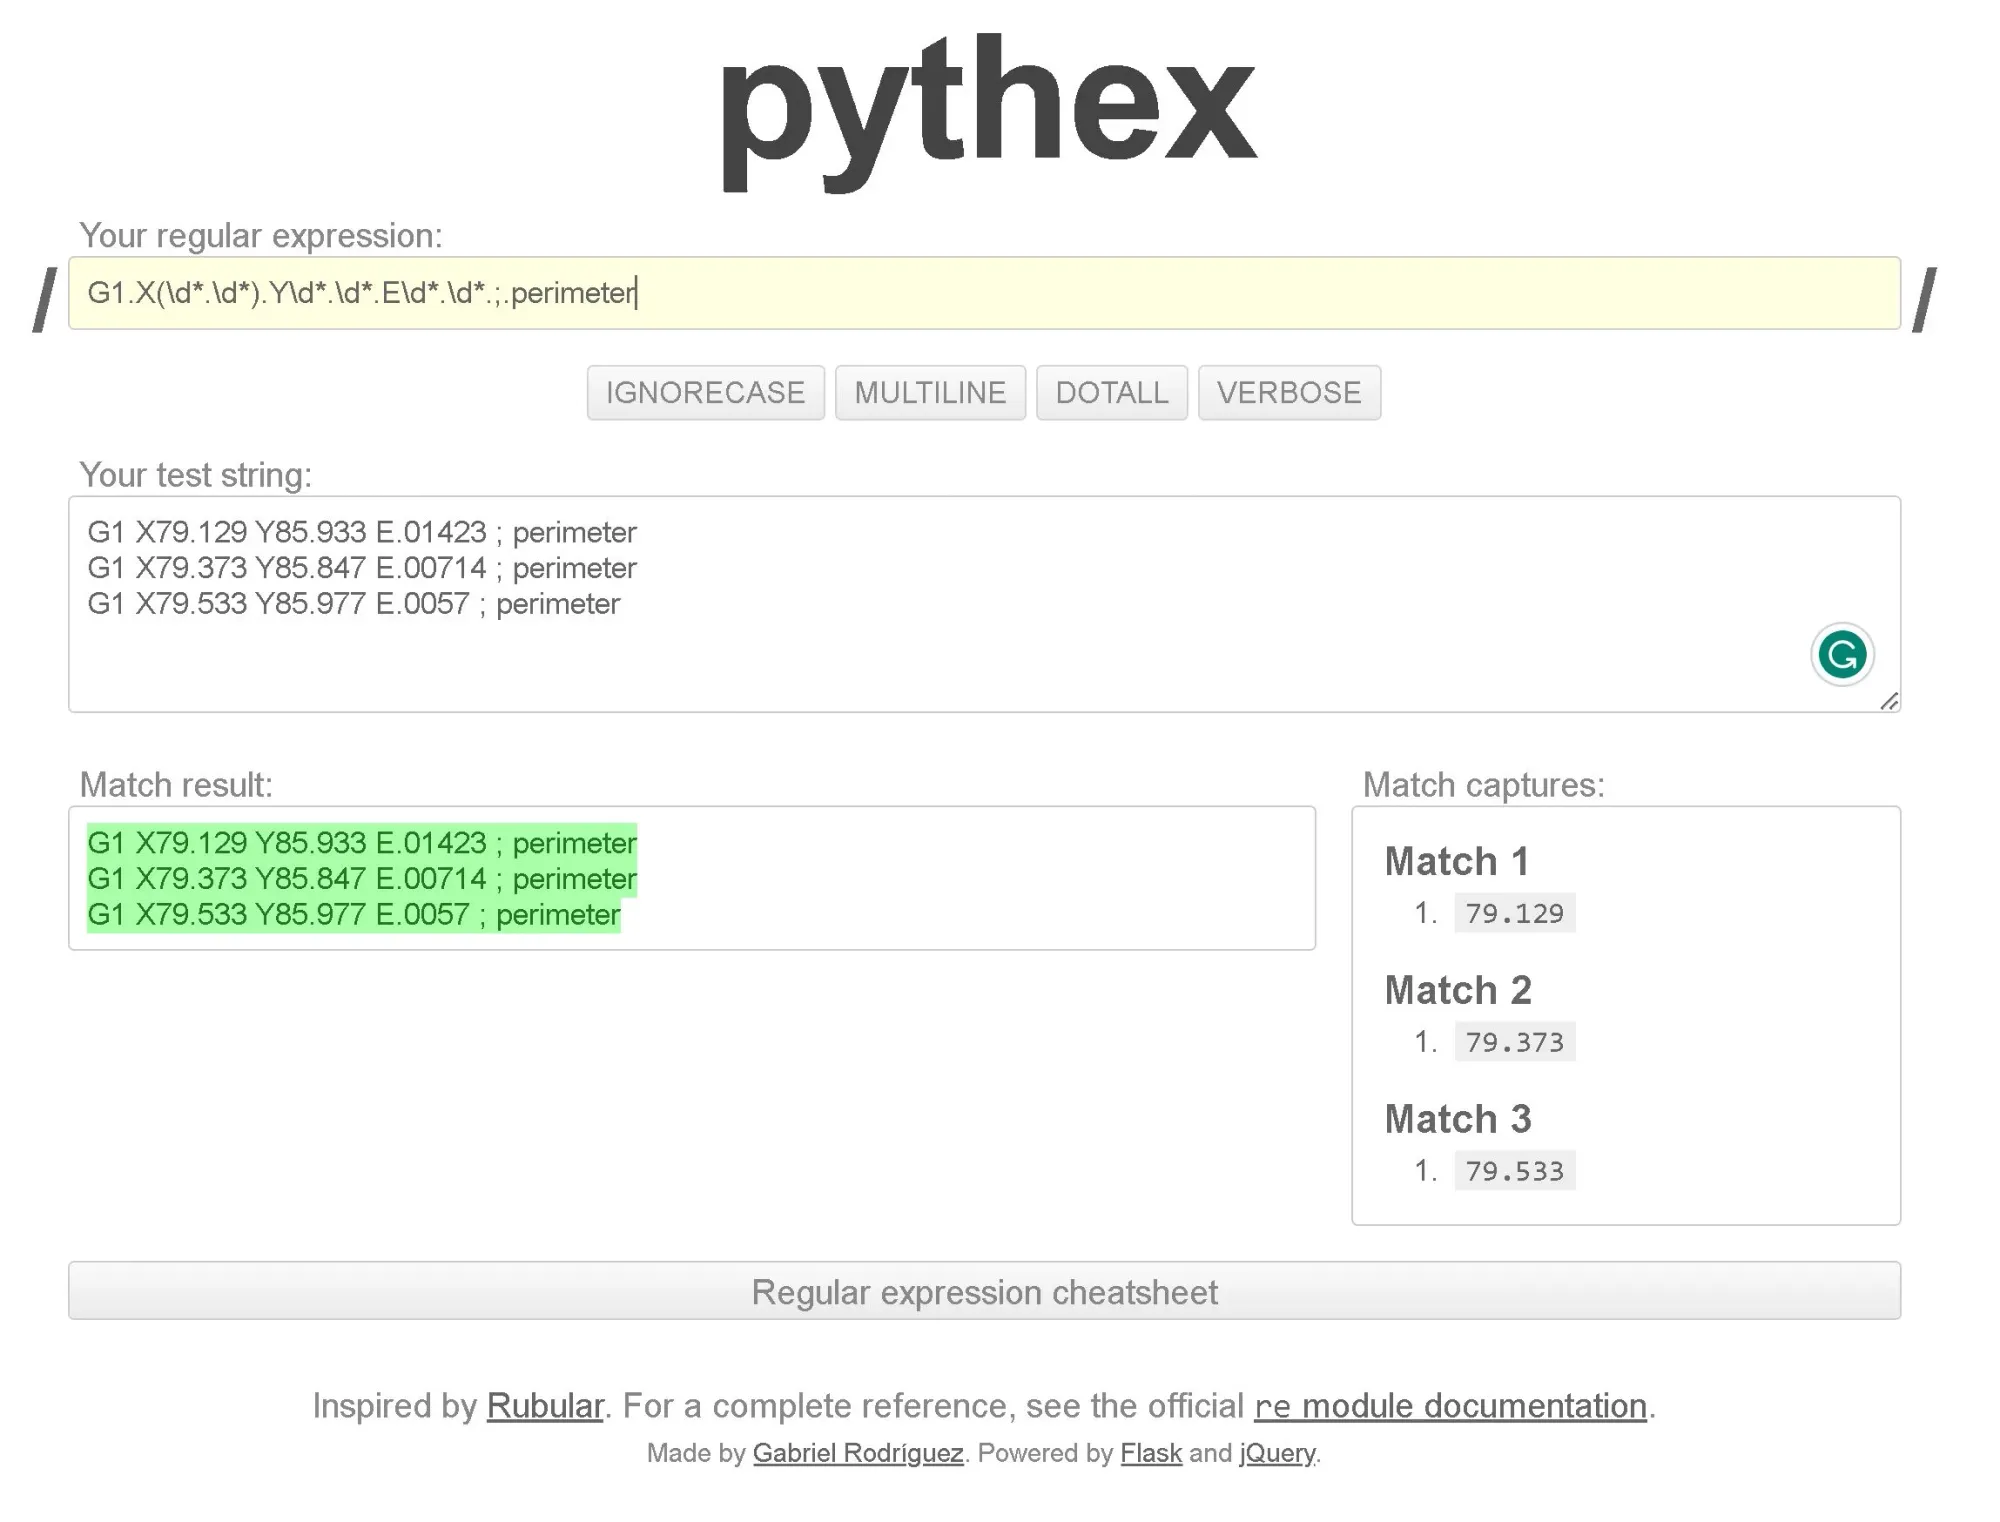
As you can see, using G1.X(\\d*.\\d*).Y\\d*.\\d*.E\\d*.\\d*.;.perimeter, we can obtain the matches for the X coordinates.
The closed parenthesis indicates what part of the pattern you want to return as a match. So we could use G1.X\\d*.\\d*.Y(\\d*.\\d*).E\\d*.\\d*.;.perimeter to get the Y coordinates.
To get the Z values, I used G1.Z(\\d*.\\d*).F\\d*.\\d*.;.restore.layer.Z.
Extrusion width
I also needed to account for the extrusion width used for the perimeters.
This is indicated with comments, but it’s split into two lines of G-Code.
This is not a problem, because using Regex you can include multiple lines in the pattern. You just need to include the “newline” character used in your text file, which in most types of encoding is \n.
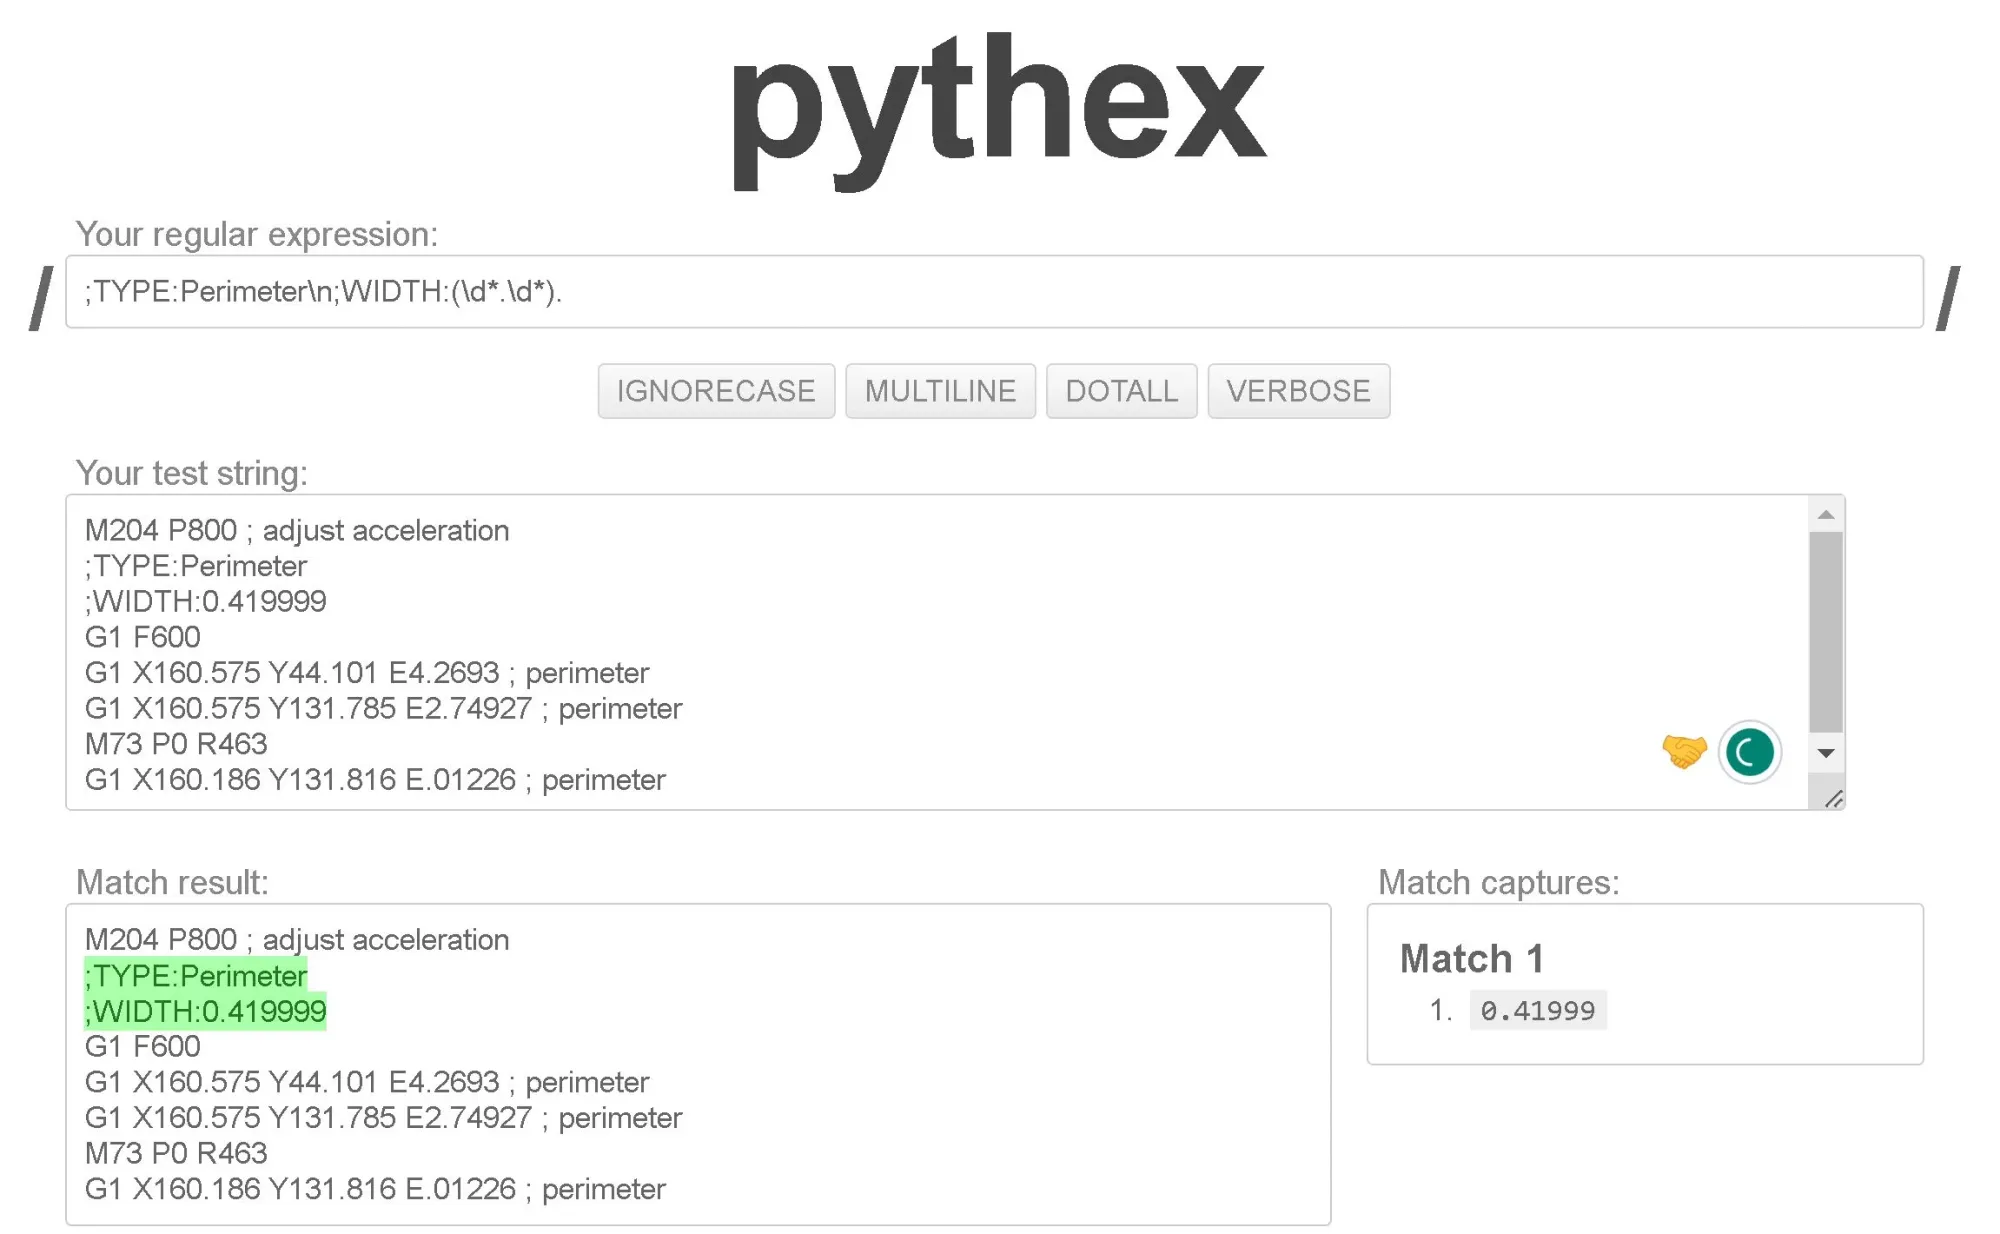
Thanks to that, I also extracted the width of the perimeters using ;TYPE:Perimeter\\n;WIDTH:(\\d*.\\d*).
Once I had the correct patterns to use, it was time to write some code.
Python script
Reading a G-code file as a string
The first step was reading the G-code file. In Python, the most common way to read a text file is to simply use the with open statement, to temporarily open the file and assign its content to a variable.
This creates an io.TextIOWrapper object, from which you can use the .readlines() method to get a list of strings, one for each line of text within the file.
To use Regex over the whole text, we could either iterate over each line, or we could just join them all, to apply the Regex on a very large string, all at once. This is what I chose to do.
with open(my_gcode_file.gco, 'r') as f:
	lines = f.readlines()     # List of strings, one for each line
	text_string = ''.join(lines) # Large string containing all the text
Getting a list of floats from Regex matches
To search for the X and Y coordinates over the whole text, I used a combined pattern for both X and Y values: G1.X(\\d*.\\d*).Y(\\d*.\\d*).E\\d*.\\d*.;.perimeter.
This way, using re.findall(text_string) would return a list of tuples of the form [('X1', 'Y1'), ('X2', 'Y2'), …]. Each element contains the matching strings for each X and Y coordinate.
This is great, but I needed a list of floats, in order to compute the maximum size.
To obtain that, I used the zip function, along with the * operator.
Zip takes an iterable object (in my case, a list of tuples) and returns an iterator of tuples based on the arguments. Calling it with *, unpacks the arguments.
When we pass this as an argument to create a list, we get a 2-elements list, where the first item is a tuple containing all the X strings, and the second one is another tuple, containing the Y strings.
To get separate lists, we can index that, and pass each element to another list.
Finally, I used list comprehensions to cast all the elements of each list as floats.
All of this is shown in the code below:
pattern_xy= 'G1.X(\\d*.\\d*).Y(\\d*.\\d*).E\\d*.\\d*.;.perimeter'
matches_xy = re.findall(pattern_xy, text_string)
# List of tuples with matching X Y strings

# Getting lists of floats from regex match results
#-------- Step-by-step ---------
it = zip(*matches_xy )            # Iterable object based on unpacked list of tuples
vertical_XY = list(it)            # List of 2 elements:
                                  # [0]: tuple of all X strings
                                  # [1]: tuple of all Y strings

x = list(vertical_XY[0])          # List of all X coordinates as strings
y = list(vertical_XY[1])          # List of all Y coordinates as strings

x = [float(el) for el in x]       # List of all X coordinates as floats
y = [float(el) for el in y]       # List of all Y coordinates as floats

#-------- Condensed ---------
x = list(list(zip(*matches_xy))[0])
y = list(list(zip(*matches_xy))[1])

x = [float(el) for el in x]
y = [float(el) for el in y]
Using a similar principle for the Z coordinates and the extrusion widths, I defined a function to get the maximum size from a string of G-code:
def get_max_size(lines):

        pattern_xy= 'G1.X(\\d*.\\d*).Y(\\d*.\\d*).E\\d*.\\d*.;.perimeter'
        pattern_z = 'G1.Z(\\d*.\\d*).F\\d*.\\d*.;.restore.layer.Z'
        pattern_width = ';TYPE:Perimeter\\n;WIDTH:(\\d*.\\d*).'

        matches_xy = re.findall(pattern_xy, lines)
        x = list(list(zip(*matches_xy))[0])
        y = list(list(zip(*matches_xy))[1])
        x = [float(el) for el in x]
        y = [float(el) for el in y]

        matches_z = re.findall(pattern_z, lines)
        z = [float(el) for el in matches_z]

        matches_width = re.findall(pattern_width, lines)
        widths = [float(el) for el in matches_width]
        avg_width = sum(widths)/len(widths)
		print(f'Avg. width: {avg_width:.2f} mm')

        x_max = max(x) - min(x) + avg_width
        y_max = max(y) - min(y) + avg_width
        z.sort()
        z_max = z[-1]
        return f'Max. X dimension: {x_max:.2f} mm\\n'\\
               f'Max. Y dimension: {y_max:.2f} mm\\n'\\
               f'Max. Z dimension: {z_max:.2f} mm\\n'\\
The final result
Finally, testing with G-code for the 18 mm cube, I obtained the desired result:
import re
input_file = 'Shape-Box_0.2mm_PLA_MINI_25m.gcode'

with open(input_file, 'r') as f:
                lines = f.readlines()
                text_string  = ''.join(lines)
print(get_max_size(text_string))

>> Avg. width:  0.45
>> Max. X dimension is 18.00 mm
>> Max. Y dimension is 18.00 mm
>> Max. Z dimension is 18.00 mm
Using this script, I was able to check which G-code file contained the correct model of the terrain to print it again.
The best part is that it works really fast, even for analyzing a large G-code file. This is because I avoided using for loops, and applied the Regex to the whole text at once, instead. I tested this using timeit to get the execution time for a number of tests.
import timeit
num_tests = 100
test_time = timeit.timeit('print(get_max_size(text_string))',
              setup='from __main__ import get_max_size, text_string',
              number=num_tests)
print(f'Number of lines of G-Code file is: {len(lines)}')
print(f'Average execution time is {test_time/num_tests} seconds, tested {num_tests} times')


# Output for an 18 mm test cube (25 minutes print):
>> ...
>> Avg. width:  0.45
>> Max. X dimension is 18.00 mm
>> Max. Y dimension is 18.00 mm
>> Max. Z dimension is 18.00 mm
>>
>> Number of lines of G-Code file is: 20262
>> Average execution time is 0.021720248 seconds, tested 100 times

# Output for a 3D terrain model (8 hours print)
>> ...
>> Avg. width:  0.49
>> Max. X dimension is 140.36 mm
>> Max. Y dimension is 92.92 mm
>> Max. Z dimension is 20.84 mm
>>
>> Number of lines of G-Code file is: 1019530
>> Average execution time is 1.6094779909999999 seconds, tested 100 times
If you'd like to have a look at the script, it is available in a public Gist from my repository. You can also download a GUI-based version that lets you select a batch of files to analyze.
In case you are interested in comparing your results, here is the test G-code I used (the one for the 18 mm cube).
About 3D printed terrain models
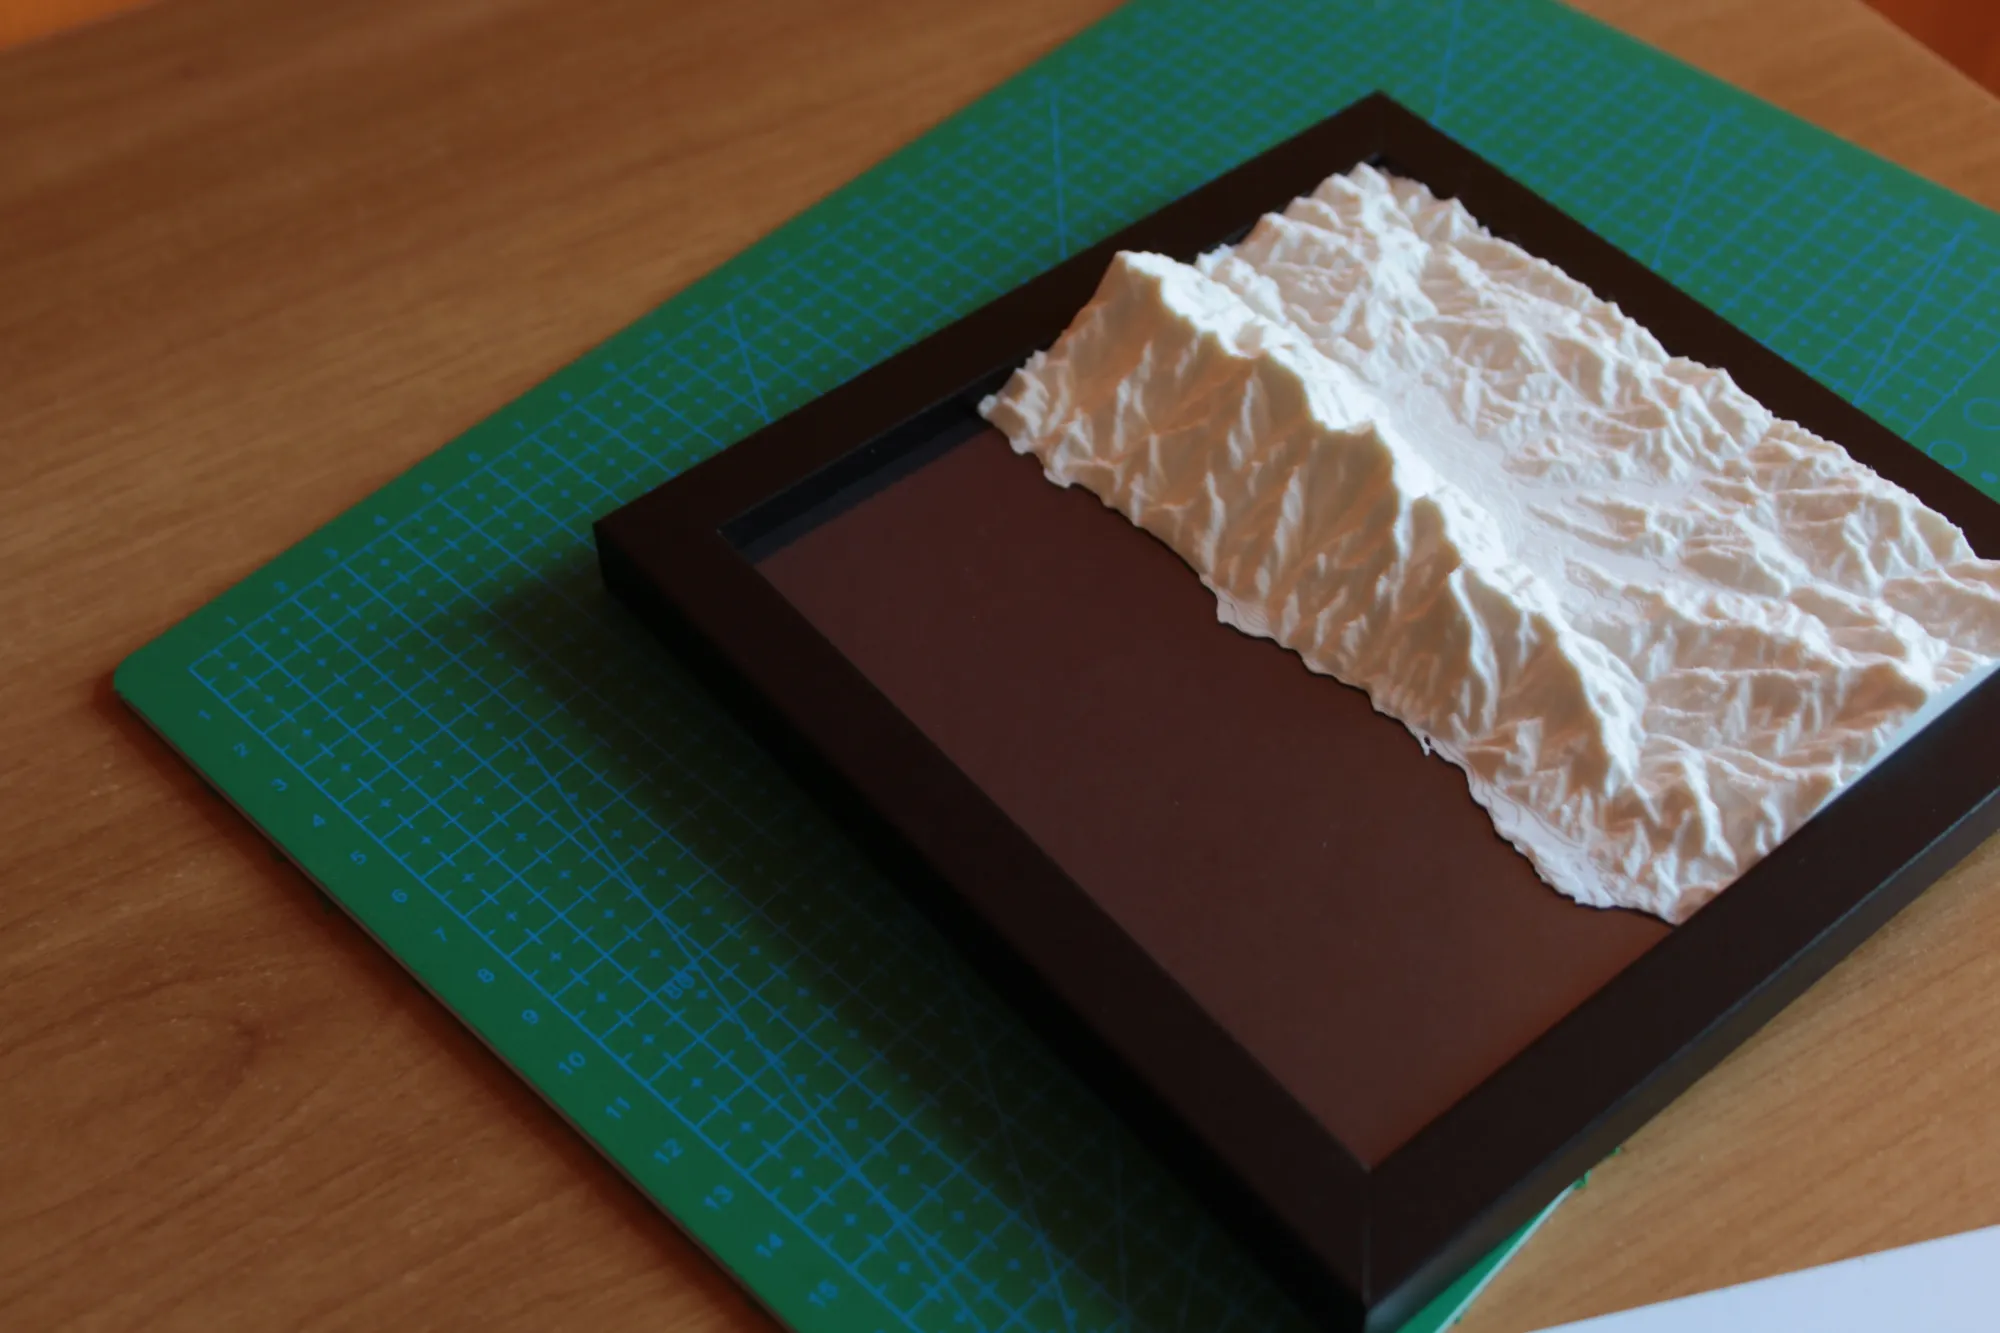
There are different sites online where you can download 3D terrain models as STL files for 3D printing. Some of the ones I found are:
I might write about how the process goes later on, but there’s a good article available on the blog from Prusa 3D.
If you are interested in learning more about what I'm doing with these, subscribe to my newsletter!
I hope this article was useful for you.
This is something I did to solve a practical problem, but also a way for me to practice using regular expressions in Python. Hopefully, this can inspire you to do a similar exercise or give you ideas for solving your own tasks using Python.
Thanks a lot for reading!